


8
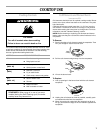
Home Canning
When canning for long periods, alternate the use of surface
cooking areas, elements or surface burners between batches.
This allows time for the most recently used areas to cool.
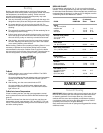
■ Center the canner on the grate or largest surface cooking
area or element. Canners should not extend more than
1 in. (2.5 cm) outside the cooking area.
■ Do not place canner on 2 surface cooking areas, elements or
surface burners at the same time.
■ On ceramic glass models, use only flat-bottomed canners.
■ On coil element models, the installation of a Canning Unit Kit
is recommended. If a kit is not installed, the life of the coil
element will be shortened. See “Assistance or Service” for
ordering instructions.
■ For more information, contact your local U.S. Government
Agricultural Department Extension Office.
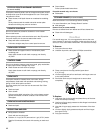
Cookware
IMPORTANT: Never leave empty cookware on a hot surface
cooking area, element or surface burner.
Ideal cookware should have a flat bottom, straight sides, a
well-fitting lid and the material should be of medium-to-heavy
thickness.
Rough finishes may scratch the cooktop. Aluminum and copper
may be used as a core or base in cookware. However, when used
as a base they can leave permanent marks on the cooktop or
grates.
Cookware material is a factor in how quickly and evenly heat is
transferred, which affects cooking results. A nonstick finish has
the same characteristics as its base material. For example,
aluminum cookware with a nonstick finish will take on the
properties of aluminum.
On some models, griddles with nonstick surfaces should not be
used in the broiler.
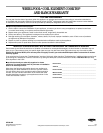
Use the following chart as a guide for cookware material
characteristics.
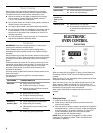
ELECTRONIC
OVEN CONTROL
Display
When the range is first plugged in, or after a power interruption,
the display will flash “12:00” until the CLOCK pad (button) is
pressed.
When the oven is in use, the display shows preheat time and the
temperature and oven setting.
When the oven is not in use, the display shows the time of day.
When using the TIMER, for settings of 1 to 59 minutes, the
display will count down in seconds. For settings 1 hour or more,
the display will count down hours and minutes.
When using COOK TIME, the display will show hours and
minutes.
Clock
Setting the Clock
1. Press the CLOCK pad (button).
2. Press the up or down pad (button) until the correct time
shows on the display.
3. Each tap of the up or down pad(s) or button(s) will change the
displayed time by 1 minute. If a button is held, the displayed
time will change in 10-minute increments. The Set Clock
mode automatically exits to the clock display mode
60 seconds after the last data change.
NOTE: When the range is first plugged in, or after a power
interruption, the display will flash “12:00” until the CLOCK
pad (button) is pressed.
COOKWARE CHARACTERISTICS
Aluminum
■ Heats quickly and evenly.
■ Suitable for all types of cooking.
■ Medium or heavy thickness is best for
most cooking tasks.
Cast iron
■ Heats slowly and evenly.
■ Good for browning and frying.
■ Maintains heat for slow cooking.
Ceramic or
Ceramic glass
■ Follow manufacturer’s instructions.
■ Heats slowly, but unevenly.
■ Ideal results on low to medium heat
settings.
Copper
■ Heats very quickly and evenly.
Earthenware ■ Follow manufacturer’s instructions.
■ Use on low heat settings.
Porcelain
enamel-on-
steel or cast
iron
■ See stainless steel or cast iron.
Stainless steel ■ Heats quickly, but unevenly.
■ A core or base of aluminum or copper
on stainless steel provides even
heating.
COOKWARE CHARACTERISTICS