


22
Prepare Cooktop and Storage Drawer:
■ Remove plastic items from the cooktop because they may
melt.
■ Remove all items from the storage drawer.
How the Cycle Works
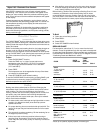
IMPORTANT: The heating and cooling of porcelain on steel in the
oven may result in discoloring, loss of gloss, hairline cracks and
popping sounds.
The Self-Cleaning cycle uses very high temperatures, burning soil
to a powdery ash.
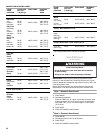
Style 1 - Electronic Oven Control
The clean cycle can be set at one of two levels Maxi Clean
(4 hours 30 minutes) or Quick Clean (2 hours 30 minutes).
Suggested clean times are 2 hours 30 minutes for light soil or
4 hours 30 minutes for average to heavy soil.
Once the oven has completely cooled, remove ash with a damp
cloth. Do not wipe down any of the inside surfaces until the oven
has completely cooled down. Applying a cool damp cloth to the
inner door glass before it has cooled completely could result in
the glass breaking.
The oven light will not work during the Self-Cleaning cycle.
The rear surface elements will not work during the Self-Cleaning
cycle.
Style 2 & 3 - Electronic Oven Control
The oven is preset for a 3 hour 30 minute clean cycle, but the
time can be changed. Suggested clean times are 2 hours
30 minutes for light soil and between 3 hours 30 minutes and
4 hours 30 minutes for average to heavy soil.
Once the oven has completely cooled, remove ash with a damp
cloth. Do not wipe down any of the inside surfaces until the oven
has completely cooled down. Applying a cool, damp cloth to the
inner door glass before it has cooled completely could result in
the glass breaking.
The oven light will not work during the Self-Cleaning cycle
To Self-Clean:
Style 1 - Electronic Oven Control
Before self-cleaning, make sure the door is closed completely or
it will not lock and the cycle will not begin.
1. Press AUTO CLEAN to set a clean time for Quick Clean
(2 hours 30 minutes).
To set the clean time on Maxi Clean press AUTO CLEAN
again to set the time at 4 hours 30 minutes.
2. Press START.
The oven door will automatically lock and DOOR LOCKED or
LOCKED, the start time and stop time will appear on the oven
display. On some models, the clean time will appear on the
oven display.
The door will not unlock until the oven cools.
When the cycle is complete and the oven cools, DOOR
LOCKED or LOCKED will disappear from the display.
3. Press any pad or open the oven door to clear the oven
display.
Style 2 & 3 - Electronic Oven Control
Before self-cleaning, make sure the door is closed completely or
it will not lock and the cycle will not begin.
1. Press AUTO CLEAN.
2. Press the TEMP/TIME “up” or “down” arrow pad to set a
clean time other than 3 hours 30 minutes. The clean time can
be set between 2 hours 30 minutes and 4 hours 30 minutes.
3. Press START/ENTER.
The oven door will automatically lock. The DOOR LOCKED
oven indicator lights will light up. The door will not unlock
until the oven cools.
When the cycle is complete and the oven cools, the oven
display and the oven indicator lights will go off.
4. Press OFF/CANCEL to clear the oven display.
To Delay Start Self-Clean:
Style 1 - Electronic Oven Control
Before delay of starting Self-Clean, make sure the clock is set to
the correct time of day. See “Clock” section. Also, make sure the
door is closed completely or it will not lock and the cycle will not
begin.
1. Press AUTO CLEAN to set a clean time for 2 hours
30 minutes (Quick Clean). Press AUTO CLEAN again to set a
clean time for 4 hours 30 minutes (MAXI CLEAN).
2. Press DELAY.
3. Press HR and MIN “up” and “down” pads to enter the time of
day to stop.
4. Press START.
The start time is automatically calculated and displayed. The
door will automatically lock, and DOOR LOCKED or LOCKED
and DELAY and the stop time will also appear on the display
(on some models). The door will not unlock until the oven
cools. When the start time is reached, the oven will
automatically turn on.
When the cycle is complete and the oven cools, DOOR
LOCKED or LOCKED will disappear from the display.
5. Press OFF/CANCEL to clear the oven display.
Style 2 - Electronic Oven Control
Before delay starting Self-Clean, make sure the clock is set to the
correct time of day. See “Clock” section. Also, make sure the
door is closed completely or it will not lock and the cycle will not
begin.
1. Press AUTO CLEAN to set a clean time to HI (4 hours
30 minutes). Press AUTO CLEAN again to change the setting
to LO (2 hours 30 minutes).
2. Press STOP TIME.
3. Press START.
The start time is automatically calculated. The door will
automatically lock, and DOOR LOCKED or LOCKED and
DELAY and the stop time will also appear on the display (on
some models). The door will not unlock until the oven cools.
When the start time is reached, the oven will automatically
turn on.
When the cycle is complete and the oven cools, “End” will
appear on the oven display and DOOR LOCKED or LOCKED
will disappear from the display.
4. Press OFF/CANCEL to clear the oven display.