


5
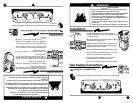
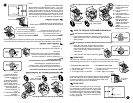
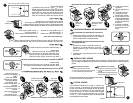
Ajuste del aire del quemador del horno:
Retire la
parrilla del
horno.
Retire la charola
del horno. (Ver
Pag. 6)
A - Afloje el tornillo del
regulador.
B - Gire el regulador un
poco.
C - Encienda el horno.
D - Verifique que las
flamas sean azules.
E - Si las flamas no son
azules repita desde
el paso
B, al finalizar
apriete nuevamente
el tornillo.
F - Coloque la charola
del horno y la parrilla
nuevamente en su
lugar.
1
2
3
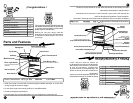
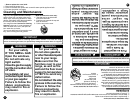
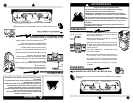
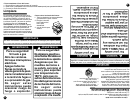
Para encender los quemadores superiores:
1.- Acerque un cerillo encendido al quemador y al
mismo tiempo presione y gire 1/4 de vuelta la
perilla del quemador correspondiente.
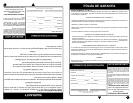
Para encender el horno con termocontrol de
encendido manual:
1.- Encienda un cerillo y colóquelo cerca del
agujero de la charola del horno, al mismo
tiempo presione y gire 1/4 de vuelta la perilla
del horno.
2.- Verifique que el quemador del horno se haya
encendido.
ENCENDIDO MANUAL DE QUEMADORES
A
PA
G
A
D
O
FLA
M
A
M
ÍN
IM
A
FLA
M
A
M
Á
X
IM
A
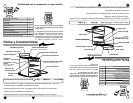
How to adjust the oven burner air shutter:
Remove the
oven rack.
Remove the oven
tray. (See page 6)
1
2
3
5
HOW TO TURN ON THE BURNERS MANUALLY
To turn on the surface burners manually:
1.- Light a match and place it close the burner while you
push and turn the knob 1/4 of the way to the maximum
flame position .
How to light the oven burner with thermocontrol, manually:
1.- Open the oven door, light a match and place
the flame at the igniter hole in the front of the
oven tray while you push in and turn the oven
knob 1/4 of the way, the burner will light
immediately.
2.- Verify that the oven burner has been ignited.
A - Locate the screw on
the air shutter and
loosen it.
B - Turn around the air
shutter.
C - Turn on the oven.
D - Verify that the flames
are blue.
E - If the flames are not
blue, repeat since
step
B, when the
flames are adjusted,
tighten the screw
again.
F - Replace the oven tray
and the oven rack
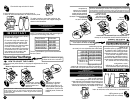
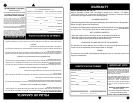
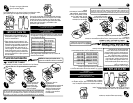
Para retirarla de la estufa:
1.- Jale la parrilla hasta el tope.
2.- Levante la parrilla de la parte frontal.
3.- Jale nuevamente para liberarla.
Para instalarla en la estufa:
1.- Empuje la parrilla hasta el tope.
2.- Levante la parrilla de la parte
frontal.
3.- Empújela nuevamente para que
llegue hasta el fondo del horno.
PARRILLA DEL HORNO
OVEN RACK
The oven has 4 different supports for the oven rack, this rack has a stop to
avoid droping from the oven, to change the rack position follow the steps:
To remove the oven rack:
1.- Pull the oven rack until it stops.
2.- Lift the front part.
3.- Pull it again until it is released.
To install the oven rack:
1.- Push the oven rack until it stops.
2.- Lift the front part.
3.- Push it again until it stops.
An extra rack position is provided for special cooking operations
other than baking, such as roasting, where a large roasting
container will require more heat and therefore need to be
closer to the heat source or oven bottom.
Para hornear alimentos muy grandes puede usarse
el soporte extra de la parte inferior.
Soporte Extra
Extra Rack
Position
El horno tiene 4 diferentes soportes para la parrilla, la parrilla tiene un tope que evita
que se salga completamente del horno, para cambiar la posición de la parrilla siga los
pasos:
A
PA
G
A
D
O
FLA
M
A
M
ÍN
IM
A
FLA
M
A
M
Á
X
IM
A
O
FF
M
IN
IM
U
M
FLA
M
E
M
A
X
IM
U
M
FLA
M
E
O
FF
M
IN
IM
U
M
FLA
M
E
M
A
XIM
U
M
FLA
M
E
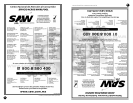
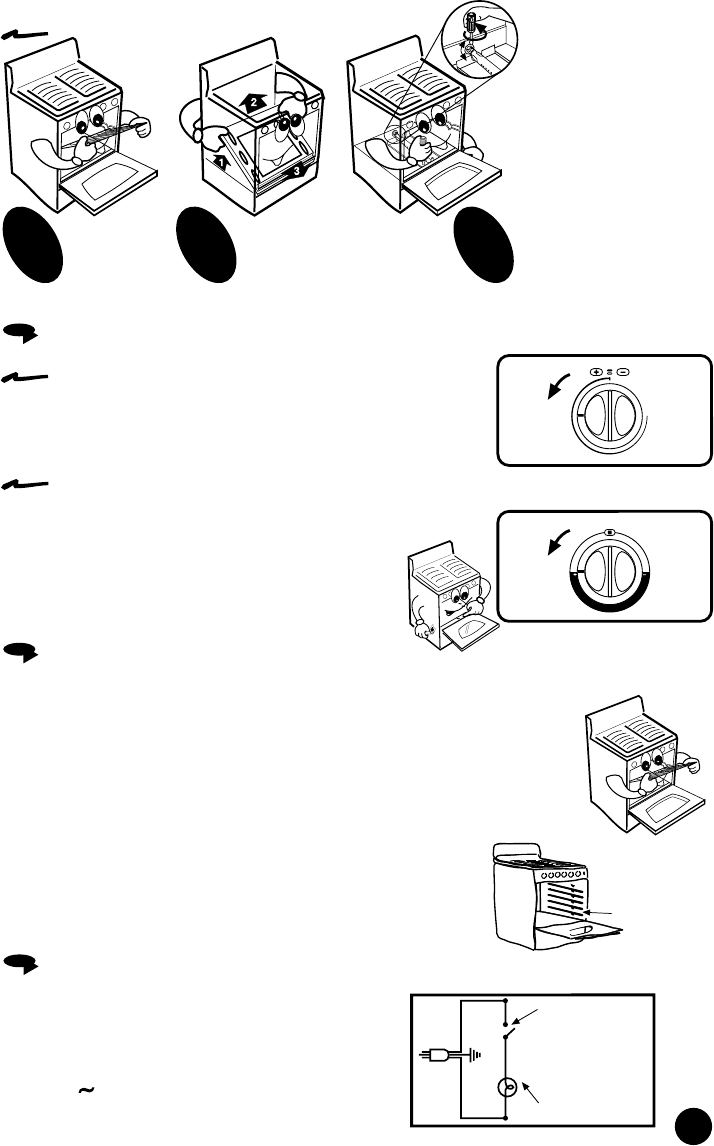
LUZ DEL HORNO
Los modelos indicados en la Pag. 2, cuentan con
luz en el horno, la iluminación es importante para
revisar el horneado sin necesidad de abrir la puerta.
El interruptor se localiza en el lado izquierdo del
frente de perillas. El cable tomacorriente deberá
conectarse a una toma de corriente con un voltaje
de 127 V
±10%. Cerciórese que la instalación esté
apropiadamente aterrizada.
Diagrama
Interruptor Luz de
H
orno.
Foco de H
orno 40 W
OVEN LIGHT
Some models (see page 2) have an oven light,
it is important to see the meals in the oven
without opening the oven door. The light switch
is located on the left side of the manifold panel.
Connect the range in a wall outlet with a voltage
of 127 V
±10% . Be sure the installation is
properly grounded.
Electric Diagram Range with Oven Light.
O
ven Light S
w
itch
O
ven Bulb 40 W