


your freezer
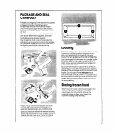
1. locate it properly - For top
performance, locate your freezer
in a cool, dry, well-ventilated
place out of direct sunlight and
away from such heat sources as
radiators. Pick a sate place,
indoors, away from inflamma-
bles such as gasoline. For
proper air circulation allow
at least two inches (5 cm]
of air space at the back
and three inches (7.5 cm)
at the sides of the freezer. Do not
cover the freezer with such
items as blankets, sheets, table-
cloths, etc. Check the strength
of the floor, make certain it can
support the weight of the freezer
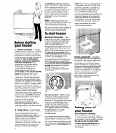
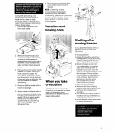
when it is loaded. If hinges need
to be removed to get freezer
through a doorway, follow these
steps. Check the way the lid
makes contact with freezer
cabinet to help when replacing
lid. With the lid closed, remove
hinge screws from the cabinet
and lift off lid. To replace lid,
place it on the cabinet
then replace hinge screws.
Be sure the gasket on the lid is
making contact with the cabinet
around all four sides.
2. Keep it level-Level freezer
from end to end and from front to
back so that the lid will seal
properly. With the lid open, lay a
spirit level on the edge of the
freezer at the end and the
front of the cabinet. If it is
necessary to level cabinet, use
wood shims. Do not use card-
board or other soft material.
2
3. Cleaning - Before starting,
wash the interior with a solution
of two tablespoons (26 g] of
baking soda to one quart (.95 L)
of warm water. Rinse and dry
Wash outside of freezer with
warm water and mild soap or
detergent, rinse thoroughly
and drv
NOTE: Cleaning waxes, con-
centrated detergents, bleaches
and cleansers containing
petroleum products should not
be used to clean door gasket or
plastic parts of the freezer.
To start freezer
Electrical Connection -Your
freezer should be connected to
its own individual receptacle,
one not controlled by a wall
switch. Make sure the
receptacle provides 120 volt, 15
amp, 60 Hz AC current. For your
safety, the power supply cord of
the freezer is equipped with a
three-pronged grounding plug.
It should be plugged into a
matching grounded three-
pronged type wall receptacle.
Attach retaining clip for cord
plug. Do not remove the ground
prong. See electrical require-
ments and grounding in-
structions sheet for complete
information.
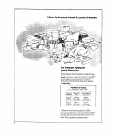
Set cold control - Insert a coin
in the slot of the control to turn
it. To start, turn cold control to
Number 3. This position will main-
tain zero zone temperatures
under normal operating con-
ditions Turn the cold control
to a higher number for colder
temperatures or a lower
number for less cold
temperatures.
let freezer cool before filling -
Allow freezer to cool 6 to B hours
before filling with frozen food.
Let it cool overnight before add-
ing a quantity of fresh food to be
frozen.
NOTE: When freezer first starts, the
compressor will run all the time
until the cabinet is cooled to a
safe storage temperature. This
first cooling may take 6 to 8
hours or longer, depending
upon the weather and number of
times the freezer lid is opened.
After the cabinet is cooled, the
compressor turns off. It will then
turn on and off as needed to
keep the freezer at a safe
storage temperature.
Exterior signal light - located
on the right front of the freezer at
the bottom, the signal light auto-
matically warns of any un-
expected power failure. When
power is being supplied the light
will glow. If light does not glow,
check immediately. The electric
current may be off; the freezer
may be disconnected from
the outlet; or the warning light
may be burned out.
Taking care of
your freezer
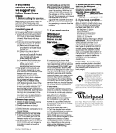
Defrosting and cleaning
When frost has built up to about
1/4 inch (6 mm] thickness, remove
by scraping. Use a plastic scrape1
Do not use an ice pick, knife
or other sharp-pointed tool as
it could damage the liner of
the freezer.