9
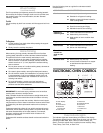
Display
When power is first supplied to the appliance, “PF” or a flashing
time will appear on the display. Press OFF/CANCEL to clear.
If “PF” or a flashing time appears at any other time, a power
failure has occurred. Press OFF/CANCEL and reset the clock if
needed.
When the oven is in use, the display shows preheat time or oven
temperature setting.
When the oven is not in use, the display shows the time of day.
When using Start Time/Cook Time, the display will show either
hours and minutes, or minutes and seconds.
If Start/Enter is not pressed after setting a function, the “Start?”
oven indicator light will begin flashing after 5 seconds.
Start/Enter
The Start/Enter pad begins any oven function. If the Start/Enter
pad is not pressed within 5 seconds after pressing a function
pad, the “Start?” indicator light will flash as a reminder.
If Start/Enter is not pressed within 1 minute after pressing a
function pad, the oven display will return to the time of day mode
and the programmed function will be canceled.
Off/Cancel
The Off/Cancel pad stops any function except the Clock, Timer
and Control Lock.
The cooling fan may continue to operate after an oven function
has been canceled, depending on oven temperature.
Clock
This is a 12-hour clock and does not show a.m. or p.m.
To Set:
Before setting, make sure the oven and Timer are off.
1. Press CLOCK.
2. Press the TEMP/TIME “up” or “down” arrow pad to set the
time of day.
3. Press START/ENTER or CLOCK.
Tones
Tones are audible signals, indicating the following:
One tone
■ Valid pad press
■ Oven is preheated (long tone)
■ Function has been entered
■ Reminder, repeating each minute after the end-of-cycle tones
Three tones
■ Invalid pad press
Four tones
■ End of cycle
Fahrenheit and Celsius
The temperature is preset at Fahrenheit, but can be changed to
Celsius on some models.
To Change: Press and hold CUSTOM BROIL for 5 seconds. A
tone will sound, and “°C” will appear on the display. Repeat to
change back to Fahrenheit. To exit mode, press OFF/CANCEL.
Timer
The Timer can be set in hours or minutes up to 12 hours and
59 minutes and counts down the set time.
NOTE: The Timer does not start or stop the oven.
To Set:
1. Press TIMER CANCEL*.
The timer oven indicator light will light up. If no action is taken
after 1 minute, the display will return to the time of day mode.
2. Press the TEMP/TIME “up” or “down” arrow pad to set the
length of time.
3. Press START/ENTER.
When the set time ends, four 1-second tones will sound.
4. Press TIMER CANCEL* anytime to cancel the timer and/or
stop reminder tones. To cancel the timer during the
countdown, press TIMER CANCEL* twice.
The time can be reset during the countdown by repeating the
above steps. To display the time of day when the timer is
counting down, press CLOCK.
Control Lock
The Control Lock shuts down the control panel pads to avoid
unintended use of the oven.
When the control is locked, only the Clock and Timer pads will
function.
To Lock/Unlock Control: Before locking, make sure the oven
and Timer are off. Touch and hold START/ENTER for 5 seconds.
A single tone will sound, and “LOC” and “LOCK’D” (on some
models) will appear on the display. “LOC” will also appear
whenever any command pad is pressed while the control is
locked.
Repeat to unlock. “LOC” and “LOCK’D” (on some models) will
disappear from the display.
Oven Temperature Control
IMPORTANT: Do not use a thermometer to measure oven
temperature because opening the oven door and element or
burner cycling may give incorrect readings.
The oven provides accurate temperatures; however, it may cook
faster or slower than your previous oven, so the temperature
calibration can be adjusted.
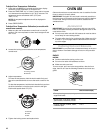
A minus sign means the oven will be cooler by the displayed
amount. The absence of a sign means the oven will be warmer by
the displayed amount. Use the following chart as a guide.
ADJUSTMENT °F COOKS FOOD
10°F (5°C) ...a little more
20°F (10°C) ...moderately more
30°F (15°C) ...much more
-10°F (-5°C) ...a little less
-20°F (-10°C) ...moderately less
-30°F (-15°C) ...much less


