


n
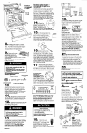
Broil burner:
Turn the orifice
hoods down
snug onto pins
(approximately
2 to 2- l/2 turns).
DO NOT OVERTIGHTEN.
D
n
Oven burner: Turn the orifice hood
down snug onto pin (approximately 2 to 2-
1 /2 turns). DO NOT OVERTIGHTEN. The burner
flame cannot be properly adjusted if this
conversion is not made.
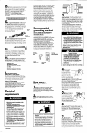
Adjusting for proper flame:
lock screw
air shutter
orke hood
Product Damage
Electric ignitors are used to light the oven
and broil burners. Do Not insert any
object into the openings of the shield
surrounding the ignltor coil.
Do Not clean this area.
Failure to follow these instructions could
result in product damage.
A
fl After all burners have been
converted, turn the range gas supply valve
back on.
B
w Cooktop burners: No burner
adjustment can be made.
Part No. 3160029@4/4371006 Rev. B
01993
C
n
Broil burner:
1. Loosen the lock screw on the air shutter
located at the rear of the broil burner.
2. Adjust the air shutter as needed. The
flame should have a 1’ long inner cone of
bluish-green with an outer mantle of dark
blue. The flame also should be clean and
soft in character with no blowing or lifting
of flame. Tighten the lock screw.
D
n
Oven burner: Locate the air shutter
near the center rear of the oven burner.
Loosen screw and adjust the air shutter as
needed. The flame should have a 1’ long,
inner cone of bluish-green, with an outer
mantle of dark blue. The flame also should
be clean and soft in character with no
blowing or lifting of flame. Tighten screw.
E
n
Replace the oven bottom, oven
racks, baffle and storage drawer. Reinstall
cooktop and burner grates.
After installation is complete, make sure all
controls are left in the “OFF” position.
Reset all controls to the “OFF” position after
using a programmable timing operation.
Make sure the air flow from the oven vent
and the air flow to the bottom front of range
is unobstructed.
If range does not
operate...
l
Check that the circuit breaker is not
tripped or the house fuse blown.
l
Check that the power supply cord is
plugged into wall receptacle.
l
Check that the gas supply is turned on.
NOTE: Refer to Use and Care Guide for
operating instructions and cleaning
instructions.
I
For cleaning and
maintenance...
If removing the range Is necessary for
cleaning or maintenance, shut off gas
supply to the range. Disconnect the gas
and electric supply.
If the range or electrical supply is
inaccessible, Ilft the range slightly at the
front and pull the range out away from the
wall. Pull the range out only as far as
necessary to disconnect the gas and
electric supply lines.
Remove the range to complete cleaning or
maintenance.
Move range back into operating position.
Insert cable into anti-tip bracket. Level the
range. Connect gas line to range and
check for leaks. Make sure that cable is
secure in anti-tip bracket. Plug electric
power supply cord into outlet.
Personal Injury Hazard
Do Not step, lean or sit on the range or the
door or drawer of the range.
Failure to follow this instructlon could result
in personal injury and/or product
damage.
If you need
assistance...
Check your Use and Care Guide for a toll-
free number to call or call the dealer from
whom you purchased this appliance. The
dealer is listed in the Yellow Pages of your
phone directory under ‘Appliances -
Major.”
When you call, you will need the range
model number and serial number. Both
numbers can be found on the serial/rating
plate located under the cooktop.
Benton
Harbor, Michigan 49022
Printed in U.S.A.