


9
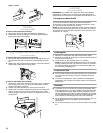
Complete the Installation
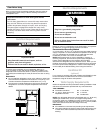
1. Lock the front casters.
NOTE: Locking the casters will help prevent the refrigerator from
moving while it is being lifted.
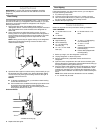
2. Insert a small piece of cardboard between the caster brake and
the floor. This will keep the brake from rubbing on the floor.
3. Stand the refrigerator upright.
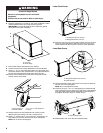
4. Replace the base grille by placing the metal clips in the openings
in the metal panel and rolling the grille downward until it snaps
into place.
5. Unlock the casters and move the refrigerator into its final
location.
6. Lock the casters.
REFRIGERATOR USE
Using the Controls
The temperature controls are located at the top front of the
refrigerator or freezer compartments.
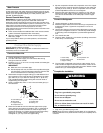
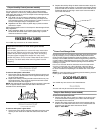
Temperature Controls
For your convenience, the temperature control is preset at the
factory. When you first install your refrigerator, make sure the control
is still set to the recommended setting as shown.
Recommended Setting “3 Snowflakes”
IMPORTANT:
■ The recommended setting should be correct for normal
household refrigerator use. The controls are set correctly when
milk or juice is as cold as you like and when ice cream is firm.
■ Wait 24 hours for your refrigerator to cool completely before
adding food. If you add food before the refrigerator has cooled
completely, your food may spoil.
NOTE: Adjusting the refrigerator and freezer temperature
controls to a colder than recommended setting will not cool the
compartments any faster.
■ If the temperature is too warm or too cold in the refrigerator or
freezer, first check the air vents to be sure they are not blocked
before adjusting the controls.
Adjusting Controls
If you need to adjust the temperature in either the refrigerator or
freezer compartment, use the settings listed in the chart below as a
guide.
■ Move the dial to the desired number of snowflakes from (1 least
cold to 5 coldest).
NOTE: Except when starting the refrigerator, do not adjust either
control more than one setting at a time. Wait 24 hours between
adjustments for the temperature to stabilize.
Cooling Off/On
Move the dial control to the word OFF. To turn cooling back on, move
the dial control to the desired temperature setting.
NOTE: Neither compartment will cool when the control is set to OFF.
REFRIGERATOR FEATURES
Your model may have some or all of these features.
Refrigerator Shelves
(Glass shelves on some models)
The shelves in your refrigerator are adjustable to match your
individual storage needs.
Storing similar food items together in your refrigerator and adjusting
the shelves to fit different heights of items will make it easier to find
the exact item you want. It will also reduce the amount of time the
refrigerator door is open, and save energy.
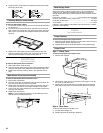
Shelves and Glass Shelves (on some models)
To remove and replace a shelf:
1. Remove items from the shelf.
2. Slide the shelf straight out to the stop.
3. Depending on your model, lift back or front of the shelf past the
stop. Slide shelf out the rest of the way.
4. Replace the shelf by sliding the back of the shelf into the track in
the wall of the cabinet.
CONDITION/REASON: ADJUSTMENT:
REFRIGERATOR too warm REFRIGERATOR Control
one setting higher
FREEZER too warm/too little ice FREEZER Control one
setting higher
REFRIGERATOR too cold REFRIGERATOR Control
one setting lower
FREEZER too cold FREEZER Control one
setting lower
Important information to know about glass shelves
and covers:
Do not clean glass shelves or covers with warm water when
they are cold. Shelves and covers may break if exposed to
sudden temperature changes or impact, such as bumping.
Tempered glass is designed to shatter into many small,
pebble-size pieces. This is normal. Glass shelves and covers
are heavy. Use both hands when removing them to avoid
dropping.