


7
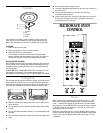
Progress Bar
The progress bar is a visual picture of the estimated running time
of a cooking cycle. It will appear during all cook cycles except
Warm Hold. The lines in each of the segments will light from left
to right as the time nears the end. When all 15 lines (all 3
segments) are lit, the cooking cycle is completed.
Number Codes
The microwave oven is preset with shortcut number codes. A
number code includes one or more of the following: cooking
power, cook time and food quantity or weight. See the charts in
the “Cooking” and/or “Reheating” sections for additional
information.
JET START™ Feature
The JET START™ control will start any function. If not touched
within 5 seconds after touching a pad, “START?” will appear on
the display as a reminder. If not touched within 5 minutes after
touching a pad, the display will return to the time of day mode
and the programmed function will be canceled.
If cooking is interrupted, touching the JET START™ control will
resume the preset cycle.
The JET START™ control, touched by itself, will automatically
start the microwave oven for a 30 second cook time at 100%
cooking power.
The JET START™ control, touched while the microwave oven is
operating in any cook function, will add 30 seconds of cook time
at the cook power currently in use. Each touch of the JET
START™ console pad will add 30 additional seconds of cook
time.
JET COOK™ Feature
The 5 JET COOK™ controls share function with the numerical
pads 1-5. When one of the 5 JET COOK™ controls is touched
(while no function is operating), the oven will begin cooking at
high power for 1-5 minutes, depending on which pad is touched.
After cooking begins, the JET COOK™ controls return to their
normal numerical pad function.
Cancel/Off
The CANCEL•OFF pad stops most functions except for the
Timer, Child Lock and Demo Mode.
The microwave oven will also turn off when the door is opened.
Close the door and touch JET START control to resume the cycle.
Clock
This is a 12-hour clock and does not show a.m. or p.m.
To Set:
The microwave oven and Timer must be off.
1. Touch CLOCK.
2. Touch the number pads to set the time of day.
3. Touch CLOCK or JET START.
To Remove:
1. Touch CLOCK.
2. Touch 0.
3. Touch CLOCK.
The time will disappear and “:” will appear on the display.
Tones
Tones are audible signals, indicating the following:
One tone
■ Valid entry (short tone)
■ End of Timer countdown (long tone)
Two tones
■ Reminder, repeat each minute after the end-of-cycle tones
■ End of stage in multistage cooking
■ Hidden feature has been entered or exited
Three tones
■ Invalid entry
Four tones
■ End of cycle
To Turn Off/On Valid Entry Tones: Touch and hold the number
pad “1” for 5 seconds until 2 tones sound. Repeat to turn tones
back on.
To Turn Off/On All Tones: Touch and hold the number pad “2”
for 5 seconds until 2 tones sound. Repeat to turn tones back on.
Timer
The Timer can be set in minutes and seconds, up to 99 minutes
99 seconds, and counts down the set time. The Timer does not
start or stop the microwave oven.
When the Timer is in use, the microwave oven can also operate.
To see the time countdown for 5 seconds when the microwave
oven is in use, touch TIMER SET/OFF.
To Set:
1. Touch TIMER SET/OFF.
If no action is taken after 1 minute, the display will return to
the time of day mode.
2. Touch the number pads to set the length of time.
3. Touch TIMER SET/OFF or JET START.
If not touched within 5 seconds, “START?” will appear on the
display. If not touched within 1 minute, the display will return
to the time of day mode and the programmed function will be
canceled.
When the set time ends, “END” will appear on the display and
1 tone will sound.
If the Timer is active in the display, touch TIMER SET/OFF to
cancel timer. If the Timer is not active in the display, touch
TIMER SET/OFF to make the Timer active in the display, then
touch TIMER SET/OFF again or CANCEL•OFF to cancel the
Timer.
Remember, touching CANCEL•OFF while a cook function is
active in the display will cancel the cook function, not the
Timer.
The time can be reset during the countdown by repeating the
above steps.