


9
5. Run 3 wires, black, white and green (14 AWG), in ½" conduit
from service panel to terminal box.
6. Use UL listed wire connectors and connect black wires
together.
7. Use UL listed wire connectors and connect white wires
together.
8. Connect ground wire to green and yellow ground wire in
terminal box using UL listed wire connectors.
9. Replace terminal box cover.
10. Check all light bulbs to make sure they are secure in their
sockets.
11. Reconnect power.
Complete Installation
1. Check lights and blower operation. See “Range Hood Use”
section.
If hood does not operate:
■ Check that the circuit breaker is not tripped or the
household fuse has not blown.
■ Disconnect power. Check that wiring is correct.
2. For non-vented (recirculating) installations, install the
charcoal filter. See “Install Filters” section.
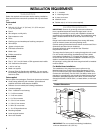
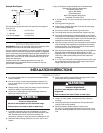
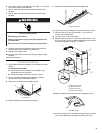
3. Place the 2 L-brackets onto the glass hood.
4. Slide the glass hood on the blower housing.
5. Attach M4 x 35 screws to secure the glass hood.
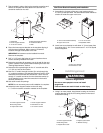
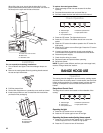
6. Install vent cover by placing both vent covers on the hood.
7. Secure lower vent cover to hood with 2 - 2.9 x 6.5 mm
screws, one on either side.
8. Lift upper vent cover to the ceiling.
9. Secure upper vent cover to vent cover bracket with 2 - 2.9 x
6.5 mm screws. Do not completely tighten the lower screws,
but leave a clearance of about ¹⁄₁₆" (2 mm).
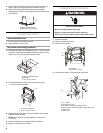
10. Apply 2 rubber strips on the inside of the aesthetic cover.
11. Fit over the glass visor. The rubber strips will work to protect
duct covers against any damage when fitting the cover.
A.L-bracket
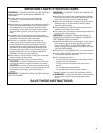
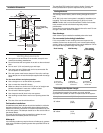
WARNING
Electrical Shock Hazard
Electrically ground blower.
Connect ground wire to green and yellow ground wire
in terminal box.
Failure to do so can result in death or electrical shock.
A
A. M4 x 35 screws
A.Vent cover bracket
B. Upper vent cover
C.Lower vent cover
D.2.9 x 6.5 mm screws
A.Rubber strips
A
A
B
C
D
D
D
D
A