


5
4. Turn shutoff valve ON.
5. Check for leaks. Tighten any nuts or connections (including
connections at the valve) that leak.
Style 3
1. Unplug refrigerator or disconnect power.
2. Remove and discard the black nylon plug from the gray water
tube on the rear of the refrigerator.
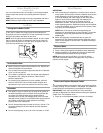
3. Thread the provided nut onto the water valve as shown.
NOTE: Tighten the nut by hand. Then tighten it with a wrench
two more turns. Do not overtighten.
4. Turn shutoff valve ON.
5. Check for leaks. Tighten any nuts or connections (including
connections at the valve) that leak.
Complete the Installation
1. Plug into a grounded 3 prong outlet.
2. Flush the water system. See “Water Dispenser.”
NOTE: Allow 24 hours to produce the first batch of ice. Discard
the first three batches of ice produced. Allow 3 days to
completely fill ice container.
Refrigerator Doors
TOOLS NEEDED: ⁵⁄₁₆" hex-head socket wrench, #2 Phillips
screwdriver, flat-blade screwdriver, ⁵⁄₁₆" open-end wrench,
flat 2" putty knife.
IMPORTANT:
■ Unplug refrigerator or disconnect power.
■ Turn off the water supply to the refrigerator. If there is water in
the dispenser’s water line, some spilling may occur during
door swing reversal.
■ Remove food and any adjustable door or utility bins from
doors.
■ If you only want to remove and replace the doors, see
“Remove Doors and Hinges” and “Replace Doors and
Hinges.”
■ All graphics referenced in the following instructions are
included later in this section after “Final Steps.”
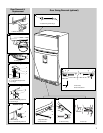
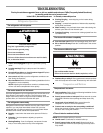
Remove Doors and Hinges
⁵⁄₁₆
" Hex-head hinge screw
1. Unplug refrigerator or disconnect power.
2. Turn off the water supply to the refrigerator.
3. Open the refrigerator door and remove the base grille from
the bottom front of the refrigerator. See Graphic 1.
4. Close the refrigerator door and keep both doors closed until
you are ready to lift them free from the cabinet.
NOTE: Provide additional support for the doors while the
hinges are being moved. Do not depend on the door magnets
to hold the doors in place while you are working.
5. Pull the water dispenser wire/tube assembly out of the
channel on the bottom of the refrigerator door. See Graphic 2.
6. Disconnect the wiring plug. See Graphic 3.
7. Disconnect the water dispenser tubing. Press the red outer
ring against the face of the fitting and pull the dispenser
tubing free. See Graphic 10.
NOTE: There may be water in the dispenser tubing if the
dispenser has been used.
8. Remove the parts for the top hinge. See Graphic 4. Lift the
freezer door free from the cabinet.
9. Remove the ⁵⁄₁₆" hex-head screw from the center rail. Loosen
the two screws on the side just enough to remove the center
hinge. Remove the center hinge. Replace the center rail
screw. See Graphic 5.
10. Lift the refrigerator door free from the cabinet.
11. Remove the parts for the bottom hinge. See Graphic 6.
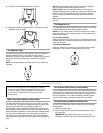
Reverse Doors (optional)
IMPORTANT:
■ If you want to reverse your doors so that they open in the
opposite direction, follow these steps. If you are not reversing
the doors, see “Replace Doors and Hinges.”
■ The the graphics shown are for a right-hand swing
refrigerator (hinges factory installed on the right).
A. Bulb
B. Nut (provided)
A
B
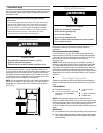
Electrical Shock Hazard
Plug into a grounded 3 prong outlet.
Do not remove ground prong.
Do not use an adapter.
Do not use an extension cord.
Failure to follow these instructions can result in death,
fire, or electrical shock.
WARNING
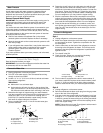
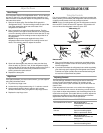
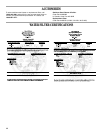
Door Handle
Screw Hole Plug
Round-Head
Handle Screw