


12
Installation
INSTALL VALVE DRAIN HOSE
1. Measure, cut to needed length and connect the 3/8"
drain line (provided) to the Central Water Filtration
System valve drain fitting. Use a hose clamp to hold
the hose in place.
NOTE: If codes require a rigid drain line see “Valve
Drain requirements" section.
2. Run the drain hose or copper tubing to the floor drain.
Secure drain hose. This will prevent the drain line
from “whipping'' during Clean Rinse cycles. See “Air
Gap Requirements" section.
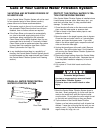
TEST FOR LEAKS
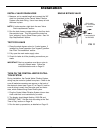
1. Place the single bypass valve (or 3 valve bypass, if
installed) in normal operation (non-"bypass") position.
See "Plan The Installation" section.
2. Fully open the main water supply valve.
3. Check for leaks at all the plumbing connections you
made.
IMPORTANT: Start up procedure must be run prior to
using any filtered water. Follow the
instructions below and on Page 13.
TURN ON THE CENTRAL WATER FILTRA-
TION SYSTEM
During installation, the Central Water Filtration System
wiring may be moved or jostled from place. Check to be
sure all leadwire connectors are secure on the back of
the electronic board (see Figure 27 on Page 21) and be
sure all wiring is away from the valve gear and motor
area, which rotates during Clean Rinse cycles.
1. Plug the Central Water Filtration System into an elec-
trical outlet that is not controlled by a switch.
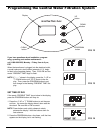
2. The display should begin flashing 12:00 PM and
“PRESENT TIME.” Set the clock according to the “Set
Time of Day” section on Page 14.
3. Run the start up procedure, as detailed on Page 13.
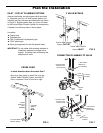
FIG. 11
SINGLE BYPASS VALVE
Pull handle
OUT for normal
operation
Push handle IN
for BYPASS