


The power indicator light is on.
The compressor makes a
buzzing noise when on.
Water shortage indicator light is
lit.
Ice full indicator light is on.
There is no indicator light on the
board.
Both water low and ice full
indicator lights are on.
Water Low light is on when the
tank is filled with water
The ice cubes are fusing
together
Water is not freezing during
normal ice making cycle.
The Voltage is lower than
required. This unit requires a
minimum of 100 volts.
1. There is no water or the
water level is too low.
2. The strainer is blocked
There is too much ice.
The fuse is blown.
The water box cannot tilt
1. Using distilled, reverse
osmosis, or other very
pure water.
2. Air pocket may be
preventing the water
from contacting the
level sensor.
1. Ice making time is too long.
2. The water temperature in the
inner liner is too low.
1. Refrigerant leaks.
2. There is a block in the
refrigerating system.
Stop the ice maker.
Make sure the voltage is 100
and restart.
1. Fill water and restart (press
stop button first then press
the start button).
2. Clean the strainer.
Set the unit to the smallest
ice cube option.
Replace the fuse.
Water box is blocked by ice
cubes. (1) Take out the cubes.
If not, (2) Turn the water box by
hand slightly and restart. If both
solutions are not successful,
please contact WindChaser
Customer Service
(see warranty).
1. Add a pinch of salt to water
so that (a) the sensor detects
the water, or (b) use less
pure water.
2. Force some water through the
hole at the bottom right of the
water tank to push water to
the sensor
1. Stop the machine and reset
the ice making time. Start
the machine after the ice
block melts
2. Replace the water in the inner
liner. The suggested water
temperature is 44.6ºF-77ºF
(7ºC-25ºC)
Contact WindChaser Customer
Service.
6 3
OPERATING INSTRUCTIONS
Pre-Operating Instructions
1. The incline angle of the cabinet should not be over 45º during transportation. Do not
turn the ice maker upside-down. Doing so could cause the compressor or refrigerating
system to operate incorrectly.
2. The ice maker should be placed on a level and solid surface and away from any heat
source and corrosive gas. If the feet of the ice maker are not at a level setting, turn
each foot clockwise to raise the foot or counter-clockwise to lower the foot. Continue
this with all feet until the unit is stable. At least six inches of clearance should be left
around the ice maker to ensure proper ventilation.
3. Before using the ice maker for the first time, wait about 12 hours after positioning it in a
proper place.
4. Clean the inside of the ice maker thoroughly. Wipe the inner liner, ice collecting board,
water box, ice pusher and evaporator rods.
Grounding Instructions
This product must be grounded. If it should malfunction or breakdown,
grounding provides a path of least resistance for electric current to reduce the
risk of electric shock. This product is equipped with a cord having an
equipment grounding conductor and a grounding plug. The plug must be
plugged into an appropriate outlet that is properly installed and grounded in
accordance with all local codes and ordinances.
Avoid the use of an extension cord because the extension cord may overheat and
cause a risk of fire. However, if you have to use an extension cord, the cord shall be
No. 16 AWG minimum size and rated no less than 1800W.
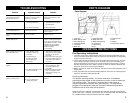
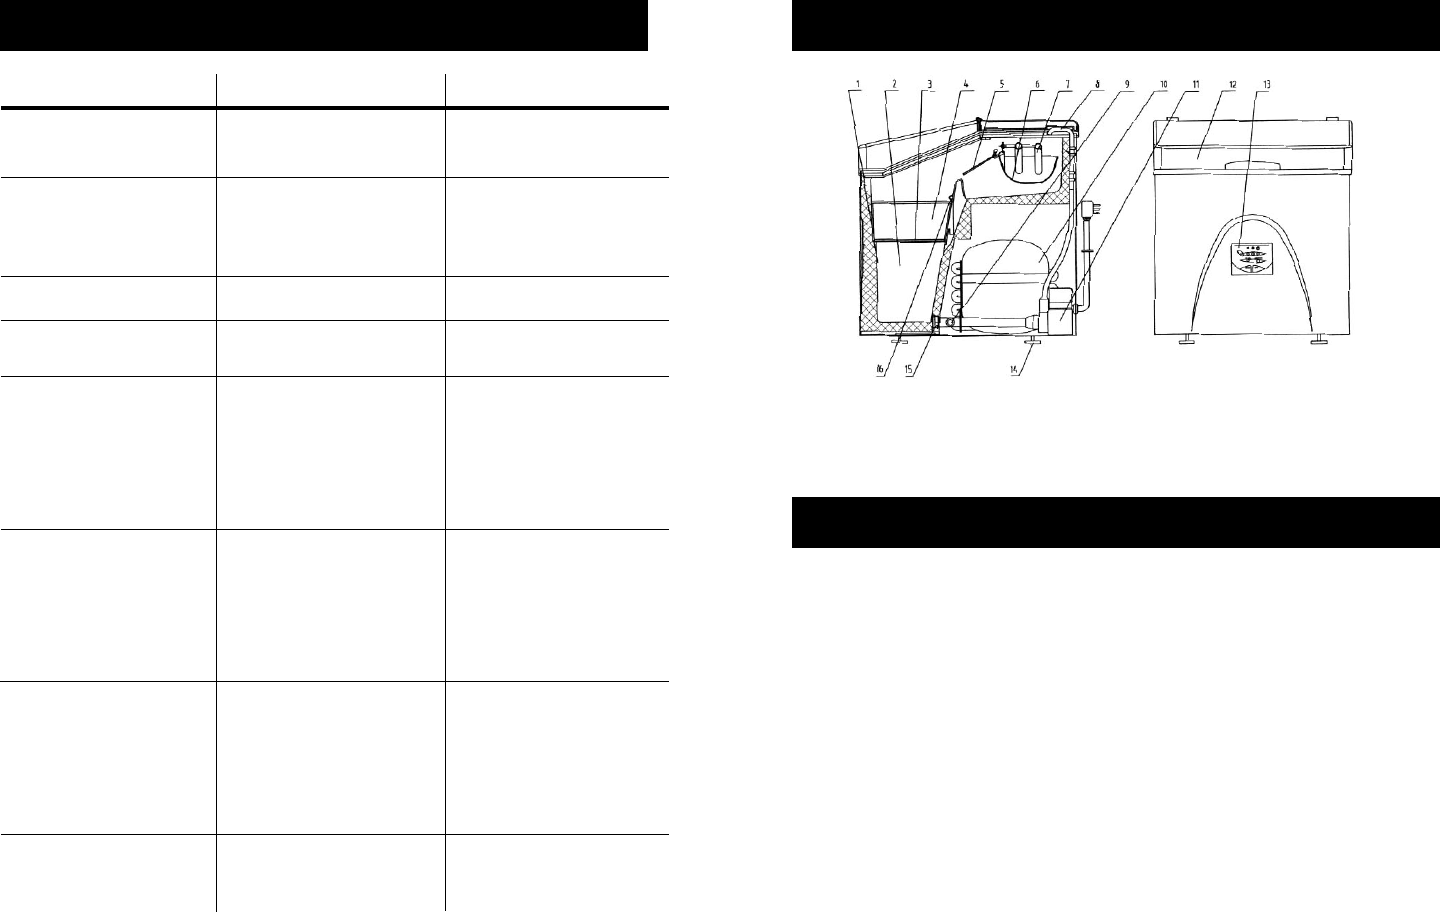
Parts Diagram
PARTS DIAGRAMTROUBLESHOOTING
Problem Possible Causes Solution
1. Inner Liner
2. Water Storage Tank
3. Ice Collecting Tray
4. Ice Storage Basket
5. Ice Pusher
6. Water Box
7. Evaporator Rods
8. Water Inlet Tube
9. Water Drainage Plug
10. Compressor
11. Water Pump
12. Lid
13. Control Panel
14. Foot
15. Strainer
16. Temperature Sensor