


– 5 –
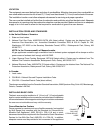
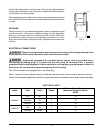
without depending on the connector and the quick-disconnect device or its associated piping to limit appliance
movement. Attach the restraining device at the rear of the oven as shown in Fig. 1.
If disconnection of the restraint is necessary, turn off the gas supply before disconnection. Reconnect this
restraint prior to turning the gas supply on and returning the oven to its installation position.
Separate instructions for installing casters to the oven are included with the casters.
Note: If the oven is installed on casters and is moved for any reason, it is recommended that the oven be
releveled front to back and side to side for even baking.
Assembling the Legs to the Single Oven
The 4" (10 cm) or 6" (15 cm) legs are packed inside the oven during shipment and must be installed on the bottom
of the oven. Place the oven on its left side, being careful to avoid scratching the finish. The gas pipe connection
protrudes beyond the back; provide for this when oven is tipped back by resting it on suitable spacers (2 x 4's
etc.). Thread each of the four leg assemblies into the holes provided on the bottom corners of the oven. Carefully
raise the oven to its normal upright position.
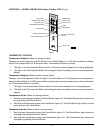
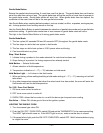
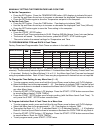
Assembling the Chimney to the Single Oven
Remove the chimney from inside the oven cavity and use the screws
provided to fasten the chimney to the top rear of the oven (Fig. 2). The
flanges on the chimney are to be positioned over the top cover.
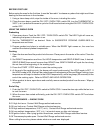
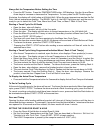
Assembling the Oven to the Stand
Position the oven on its back, taking care not to scratch or damage it. The
gas pipe connection protrudes beyond the back; provide for this when the
oven is tipped back by resting it on suitable spacers (2 x 4's). Install the two
locating studs (included in the stand carton) into the screw plates on the
underside of the oven (Fig. 3).
Attach each of the four leg assemblies to the bottom of the stand with the
12 bolts and lockwashers (3 per leg). If casters are used instead of legs,
put fixed casters in rear and swivel casters in front using 12 bolts and
lockwashers (3 per caster). Mount the oven on top of the stand.
Assembling Stacked Ovens
Determine which oven will be on the bottom and place it on its left side,
being careful to avoid scratching the finish. Install the four 16
3
/4" (42.5 cm)
legs, using the 24 bolts and lockwashers provided (6 per leg). Remove the
two
7
/16" (1.1 cm) knockouts on each side of the top cover and place oven
in upright position at installation location. Turn the adjustable feet in or out
to level the oven front-to-back and side-to-side (refer to LEVELING, page
6).
Remove right side panels from both ovens. Remove welded plate from bottom of upper oven (Fig. 3). Install
the two locating studs (included in the leg stack set) into screw plates on underside of upper oven (Fig. 3).
Place upper oven on top of lower oven using the locating studs.
Remove flue extension from upper oven. Install long flue extension into existing right-angled flue extension
in lower oven. Attach long flue extension to wall of upper oven using screws provided. Secure chimney to
roof of upper oven (Fig. 4).
CHIMNEY
PL-52240
Fig. 2
REAR OF TOP OVEN
KNOCK OUT WELDED PLATE
FOR FLUE EXTENSION INSTALLATION
BOTTOM
LOCATING STUDS
PL-52992
FRONT OF TOP OVEN
Fig. 3