


HOB USE
USING GAS BURNERS
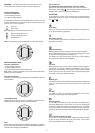
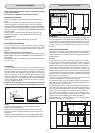
The following symbols are on the control panel next to each knob:
- Black circle gas off
- Large flame maximum setting
- Small flame minimum setting
The minimum setting is at the end of the anticlockwise rotation of
the knob. All operation positions must be selected between the
positions of max. and min., never select them between max. and
off.
MANUAL IGNITION (during mains power failure)
To ignite the burner, press the knob of the selected burner and
turn it anticlockwise to the minimum position then light with a
match.
AUTOMATIC ELECTRIC IGNITION (optional)
To ignite the burner, press the knob of the selected burner and
turn it anticlockwise to the minimum position. Keeping the knob
pressed in, the automatic ignition of the burner will operate.
In case of power failure, the burner can also be lit using a match.
APPLIANCES WITH THERMOCOUPLES (if fitted)
Follow the same procedure described above to ignite the burners.
In this case, once the burner is lit you have to hold the control
knob pressed in for approximately 10 seconds until the burner
flame stays on, if the flame does not stay on repeat the process.
If for any reason the burner flame goes out, the safety valve
automatically shuts off the gas supply to the burner in question.
ENERGY SAVING TIPS
• The diameter of the pan bottom should correspond to that of
the burner. The burner flame must never extend beyond the
diameter of the pan. Use flat-bottomed pans only.
• Whenever possible, keep a lid on the pan while cooking, this
will save energy.
• Cook vegetables, potatoes, etc. with as little water as possible
to reduce cooking times.
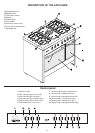
Fig.1
USE OF THE ELECTRIC OVEN
The first time the oven is used, it may give off smells, these are
caused by residues left by the production processes and is quite
normal. Ensure there is adequate ventilation in the room before
performing this action. (It is necessary to heat up the oven at
the maximum temperature for about 30-40 minutes in order
to burn off these residues).
Once this process is complete cooking can commence.
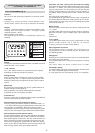
The oven is fitted with: a wire trivet for cooking food contained in
oven dishes or placed directly on the trivet itself, a drip-tray for
cooking sweets, biscuits, pizzas, etc., or for collecting juices and
fats from food cooked directly on the trivet.
Note: The tables at page 6 give the main points for cooking some
of the most common dishes. The cooking times recommended in
these tables are approximate. After a few tries, we are sure that
you will be able to adjust the times to get the results you want.
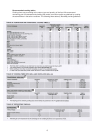
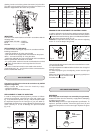
BURNERS PANS
Ø min. Ø max
RAPIDE 180 mm 220 mm
SEMIRAPIDE 120 mm 200 mm
AUXILIARY 80 mm 160 mm
TRIPLE CROWN 220 mm 260 mm
Before the first use of the oven
5