


1
2
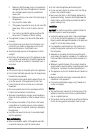
1. Remove the plug from
the power socket.
2. Remove the top hinge
cover.
3. Unscrew the 2 retaining
screws, and remove the
hinge from the appliance.
4. Take the door off.
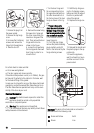
5. Remove the screw fixing
the lower door hinge and
the other screw fixing the
lower door hinge and the
foot. Then remove the door
hinge and the foot as
shown in the Figure.
6. Loosen the screw fixing
the foot opposite the lower
door hinge in order to re-
move the foot.
7. Fix the door hinge and
the corresponding foot on
the opposite side and then
the other loosened foot at
the former place of the door
hinge as shown in the Fig-
ure.
8. Please make sure to
place the lower foot below
the door hinge. The lower
foot is recognizable by its 4
ribs on the outer surface.
9. Fix the door onto the
lower hinge pin.
10. To fit top door hinge,
remove the plastic blanking
plugs carefully, and refit
them in the holes left by the
hinge retaining screws.
11. Refit the top hinge us-
ing the 2 retaining screws,
taking care that the edge of
the door is parallel with
side of the cabinet.
12. Replace the hinge cov-
er.
13. Relocate the handle and
the plastic plugs to the op-
posite side.
14. Level the appliance,
wait for at least four hours
and then connect it to the
power socket.
Do a final check to make sure that:
• All screws are tightened.
• The door opens and closes correctly.
If the ambient temperature is cold (i.e. in Winter), the gas-
ket may not fit perfectly to the cabinet. In that case, wait
for the natural fitting of the gasket.
In case you do not want to carry out the above mentioned
operations, contact the nearest After Sales Service Force.
The After Sales Service specialist will carry out the rever-
sibility of the doors at your cost.
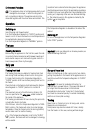
Electrical Connection
Caution! Any electrical work required to install this
appliance should be carried out by a qualified
electrician or competent person.
Warning! This appliance must be earthed.
The manufacturer declines any liability should these
safety measures not be observed.
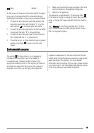
1 2
3
4
5
Important! The wires in the mains lead are coloured in
accordance with the following code:
1
Green and Yellow: Earth
3
Brown: Live
10