


10
www.zephyronline.com
9
10
12
11
13
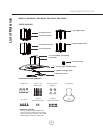
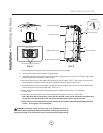
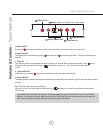
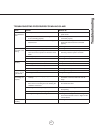
Top duct covers
Top support frame
Bottom duct covers
Bottom support frame
Thin trim piece
Thick trim piece
cut-down
7. Install electrical and duct work. Seal duct work with aluminum duct tape.
8. Power up hood and check for leaks around duct tape.
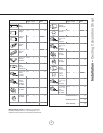
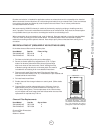
9. *Assemble top duct covers (with louver holes) together using (2) M3 x 6 screws. (FIG. E, #9). Larger screw
hole openings should overlap the smaller holes.
10. Secure top duct covers to top support frame using (2) M4 x 8 screws. (FIG. E, #10). Note: If using hood in
“ducted mode” the top duct covers may be turned upside-down to hide the louver holes.
11. Assemble bottom duct covers together over top duct covers using the fi nal (4) M3 x 6 screws. Bottom duct
covers should rest on top of the hood body. (FIG. E, #11)
12. Insert the (2) thin trim pieces into left and right seams of bottom duct covers. (1 on each side)
(FIG. E, #12)
13. Insert the (2) thick trim pieces into left and right seams of top duct covers. (1 on each side)
Note: Because less of the top duct covers will be exposed, it may not be necessary to measure and
cut the thick trim pieces with a hack saw before installing them into the top duct covers.
* If using hood in recirculating mode you must install the air diverter plate before assembling the duct
covers. Turn to page 11 for instructions.
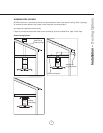
Installation – Mounting the Hood
WARNING: Electrical wiring must be done by a qualified person(s) in
accordance with all applicable codes and standards. This range hood must be
properly grounded. Turn off electrical power at service entrance before wiring.
!
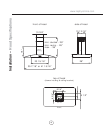
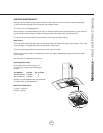
screw holes (4) for the canopy
(Bottom of the hood)
FIG. D
FIG. E
canopy