SIDEWINDER PG. 5
lube and change the oil at 25 hour intervals. The
service alert only flashes during operation and it
warns you to change the oil for only two hours.
After the two hours is reached, the alert will
automatically reset to the next 25 hour interval.
Therefore, it is recommended that a separate
maintenance log be kept to track oil changes.
Remember that being safe is a full-time, every
day job. Follow all information posted on the
machine and the LPG tank.
Never allow anyone to operate this machine
who has not read or cannot understand the
given instructions.
C. Troubleshooting the electrical system
1. Check all wire connections for obvious
problems. Remove LPG tank, then remove
battery box cover. Check all connections
visibly and physically. If any “loose”,
damaged or unconnected wires are
noticed, replace or repair as needed.
2. Check the battery posts and wires. Always
wear a face shield, safety glasses and
protective clothing when working around
a battery! The gases can be explosive and
the acid is highly corrosive to metals,
cloth and ALL HUMAN TISSUE (skin,
eyes, etc.) If the battery post(s) are
corroded, remove the wires and clean
posts and wires. Applying some axle
grease on the posts of the battery after
they are cleaned will slow down the
battery corrosion process. If nothing
obvious is noted, a more detailed
investigation is warranted. Before any
such troubleshooting begins, the
following things should be done:
3. Replace propane LPG tank with one from
a machine that runs.
4. Charge the battery or provide an absolute
source of 12 volt DC power capable of 50
amperes total output. (A pair of good
jumper cables from your car or truck
battery will suffice.) Equip yourself with an
inexpensive 12 volt test light.
5. If the trouble seems to be in the electrical
control equipment, you may wish to
disconnect the starter from the system so
as to check the system without spinning
the engine.
6.Batteryrundown. Acommon problemis
lettingthe batteryrun down.Whatusually
happens isthatittakes thecrewa few jobs to
getusedtothe wholesystem,so themachine
isstoppedandstartedquite often. Keyleftin
onposition,whenengine isturnedoff,will
resultin batteryrunningdown—dying.
D. Troubleshooting Main Drive Belts
If the engine runs, but the drive unit will not engage,
this is usually related to the main drive brush belt or
belt tension spring. Without removing the drive unit
you can check and fix the following:
1. Remove the four 3/8" bolts holding the belt
cover to the body. Remove the (1) 3/8" bolt
holding the muffler bracket to the belt cover.
Check if belt tension spring is attached to the
idler spring mount bolt on the body.
2. Check to see if belts have come off of input
pulley or centrifugal clutch. If so, install belts
back on the pulley. Note: If belts come off
again they are probably worn or stretched
and need replacement.
3. To replace engine drive belts:
Loosen the (3) bolts on the right hand side
of the upper deck approximately 4 to 5 turns.
Be sure at least half of the bolt threads
remain engaged. Place machine in the tilt-
back position. Remove old or worn belts and
replace them with the new ones. Remove
one end of the tension spring to aid in
installation of new belts. Check for wear on
the springs and their catches.
4. Re-attach tension spring to mount bolt and
tighten (3) 1/2" bolts. Slide the belt cover into
place and start (4) 3/8" bolts into belt cover
(hand tighten only). Start (1) 3/8" bolt into
muffler bracket and belt cover, then tighten
all (5) 3/8" bolts.
5. To change the brush drive belt: Remove
three (3) bolts on the right hand side of
upper deck (use a 3/4" wrench). Slowly raise
front of machine off the floor. Remove Input
Boom Pulley and Boom Arm from Brush
Drive by using the two 3/4" wrenches—
sliding them into the slots in the boom
pulley shaft to unscrew the pulley from the
shaft. Remove six (6) bolts from bottom side
of Brush Drive and split Brush Drive Top Pan
and Brush Drive Plate. Remove worn belt
and replace. It is a good idea at this time to
check the Tension Spring, bearings and idler
for damage and replace them if necessary.
Engine Oil
Check the engine oil daily before starting the
engine otherwise shortage of the engine oil may
cause serious damage to the engine such as
seizure.
• Place the engine on a level surface. Clean the
area around the oil gauge before removing it.
• Remove the oil gauge and wipe it with a clean
cloth.
• Pour the oil slowly to “FULL” mark on the oil
PG. 8 SIDEWINDER
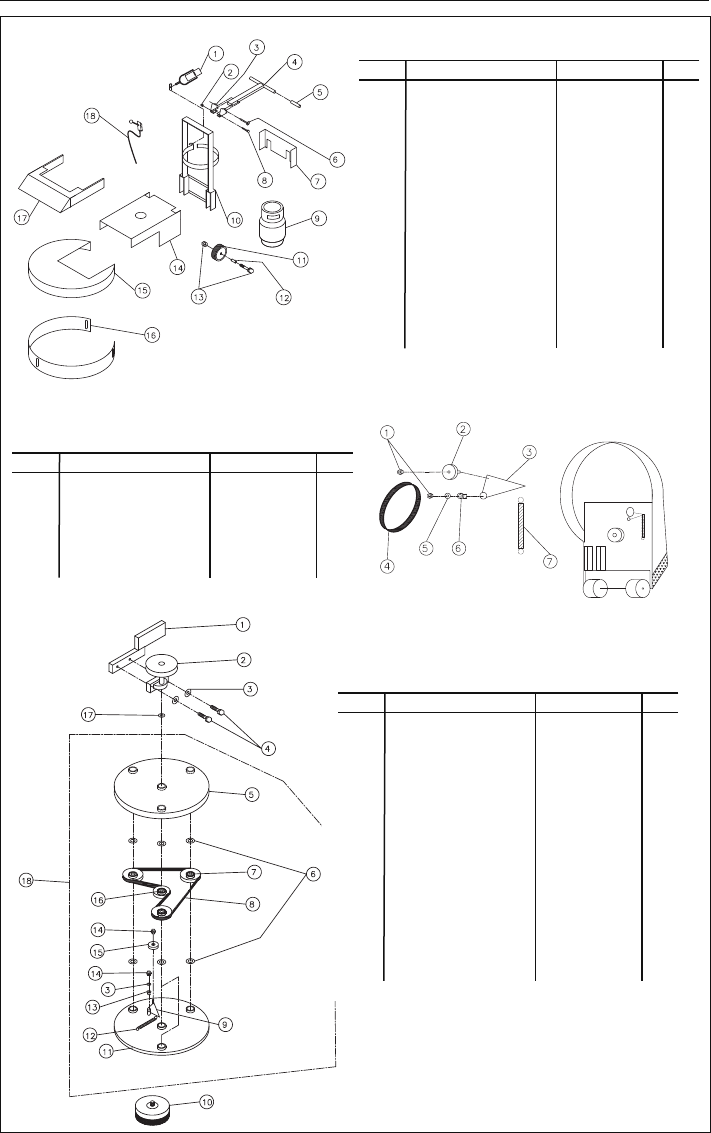
SIDEWINDER 30" BODY PARTS
PART # DESCRIPTION PART# QTY
1 TOGGLE &NUT 284-TB2-60 1
2 3/8-16LOK-NUT 164-22834 5
3 LEFTBRACKET 283-025-400 1
RIGHTBRACKET 283-025-500 1
4 T-HANDLE 283-025-600 1
5 HANDLEGRIP 224-1 2
6 LOK-PIN 625-98404A385 1
7 KICK PLATE 283-010-04 1
8 3/8-16*3BOLT 164-10131 1
9 20# LPCYLINDER 293-20#STLMF 1
10 HANLEASSEMBLY 010-971CCH 1
11 6"WHEEL 156-XA-06251-12 2
12 SPANNERBUSHING 156-ZF-0812-39 2
13 AXEL& NUT 156-ALBZJ085408 2
14 BODY 288-010S-01 1
15 BRUSHDRIVECOVER 283-010-5-02 1
16 SPLASHSKIRT 010-50971S 1
17 BELTCOVER 283-01024-03 1
18 THROTTLECABLE 196-60314 1
SIDEWINDER 30"
PART # DESCRIPTION PART# QTY
1 3/8-16 HEXNUT 164-22004 2
2 TENSIONPULLEY 188-V42B 1
3 BELTTENSIONER 010-962T 1
4 BELT 113-L537 1
5 5/16 FLAT WASHER 164-20156 1
6 NYLONBUSHING 196-71200 2
7 TENSIONSPRING 173-7599-DWG 1
SIDEWINDER 30" LOWER DRIVE
PART # DESCRIPTION PART# QTY
1 HEADSUPPORTBOOM 010-962B 1
2 INPUTBOOM PULLEY 010-962S1 1
3 5/16FLATWASHER 164-20156 3
4 3/8-16*2BOLT 164-10123 2
5 24"TOPPAN 010-962MS 1
6 BELLEVILLEWASHER 164-20250 8
7 OUTERPANPULLEY 010-962S3 3
8 BELT 113-BB81 1
9 BELT TENSIONER 010-962TT 1
10 BRUSHOPTIONS
HVYDUTYSTRIP(RED) 010-962STBH 3
HEAVY SCRUB(BLUE) 010-962SCB 3
PADHOLDER 010-962STP 3
11 30"STEELPLATE 010-962MP 1
12 TENSIONSPRING 173-7599-DWG 1
13 NYLON BUSHING 198-71200 1
14 3/8-16 HEXNUT 164-22004 2
15 TENSIONPULLEY 188-V42B 1
16 CENTERPAN PULLEY 010-962S2 1
17 BOOMPULLEYWASHER 164-58114F 1
18 BRUSH DRIVEUNIT 010-953B 1
T
TT


