68-1290-50
Rev. A 04 11
4
Extron USA - West
Headquarters
+800.633.9876
Inside USA/Canada Only
+1.714.491.1500
+1.714.491.1517 FAX
Extron USA - East
+800.633.9876
Inside USA/Canada Only
+1.919.863.1794
+1.919.863.1797 FAX
Extron Europe
+800.3987.6673
Inside Europe Only
+31.33.453.4040
+31.33.453.4050 FAX
Extron Asia
+800.7339.8766
Inside Asia Only
+65.6383.4400
+65.6383.4664 FAX
Extron Japan
+81.3.3511.7655
+81.3.3511.7656 FAX
Extron China
+400.883.1568
Inside China Only
+86.21.3760.1568
+86.21.3760.1566 FAX
Extron Middle East
+971.4.2991800
+971.4.2991880 FAX
© 2011 Extron Electronics All rights reserved. www.extron.com
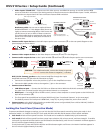
Configuring the DVS 510 Using the Front Panel
Menu selections are displayed on the front panel LCD screen. To use any menu, press the Menu
button repeatedly until the desired menu is displayed. Press the Next button repeatedly until
the desired submenu is displayed. Rotate the appropriate Adjust knob to select an item from a
submenu. To exit a submenu and return to the main menu, press the Menu button at any time.
1. From the Output Configuration submenus, use the Adjust knobs to select the output
resolution and refresh rate, the output signal type, and the sync polarity to match the
requirements of the display device.
2. From the Advanced Configuration menu, Test Pattern submenu, select the Alternating
Pixels (Alt Pixels) test pattern. Adjust the active pixels, total pixels (clock), and pixel
phase settings for your display for optimal picture quality.
3. From the Advanced Configuration menu, set the test pattern to Crop, and adjust the
position settings of the display until all four sides of the crop pattern are visible. Disable
the Crop test pattern.
4. Use the Input Configuration submenus to make any desired adjustments to the applied
input signals, including turning film mode detection on or off and setting the horizontal
and vertical start, pixel phase, total pixels, active pixels, and active lines.
5. Press and hold each input button for 3 seconds to perform Auto-Image on the input.
Auto-Image sizes the input to fit the current window size.
6. Use the Picture Control buttons to adjust the size, position, brightness, contrast, color, tint,
detail, zoom, and pan for each input as needed.
7. Use the Audio Configuration submenus to configure the audio as desired.
8. Use the User Presets menu to save the set of adjustments for manual recall later.
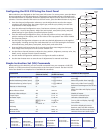
Simple Instruction Set (SIS) Commands
When setting up the DVS 510, you can issue SIS commands from your computer via RS-232,
RS-422, or a LAN connection as an alternative to the front panel controls. See the DVS 510
Series User Guide for a complete list of available SIS commands.
Command
ASCII command
(Host to Scaler)
Response
(Scaler to Host)
Additional Description
Select an audio and video input
X!
! In
X!
• All
]
Select video and audio from input
source X!.
Audio breakaway (select input)
X!
$ In
X!
• Aud
]
Select only audio from input
X!
.
Video breakaway (select input)
X!
& In
X!
• RGB
]
Select only video from input
X!
.
Execute an Auto-Image
A Img ]
Perform Auto-Image on the current
input.
Mute video to black
1B Vmt1]
Mute the video and display a black
screen.
Unmute video and sync
0B Vmt0 ]
Disable all mutes.
Freeze input
1F Frz1 ]
Freeze the selected input.
Unfreeze input
0F Frz0 ]
Unfreeze
s
elected input.
PIP on
E
X!
PIP } Pip
X!
] Turn on PIP and display input
X!
.
PIP off
E
0PIP }
Pip0 ]
Turn off PIP.
PIP Swap
% Tke ]
Switch the displayed content
between main and PIP windows.
Mute audio
1Z Amt1 ]
Mute audio for the current input.
Unmute audio
0Z Amt0 ]
Unmute the current audio input.
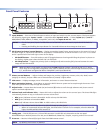
Input
Configuration
Menu
Menu
Menu
30 sec.
View
Comm Setting
Menu
30 sec.
30 sec.
Default
Cycle
Next
Exit Menu?
Press NEXT
Menu
30 sec.
User
Presets
30 sec.
30 sec.
Menu
Audio
Configuration
Menu
30 sec.
Advanced
Configuration
Output
Configuration
Menu