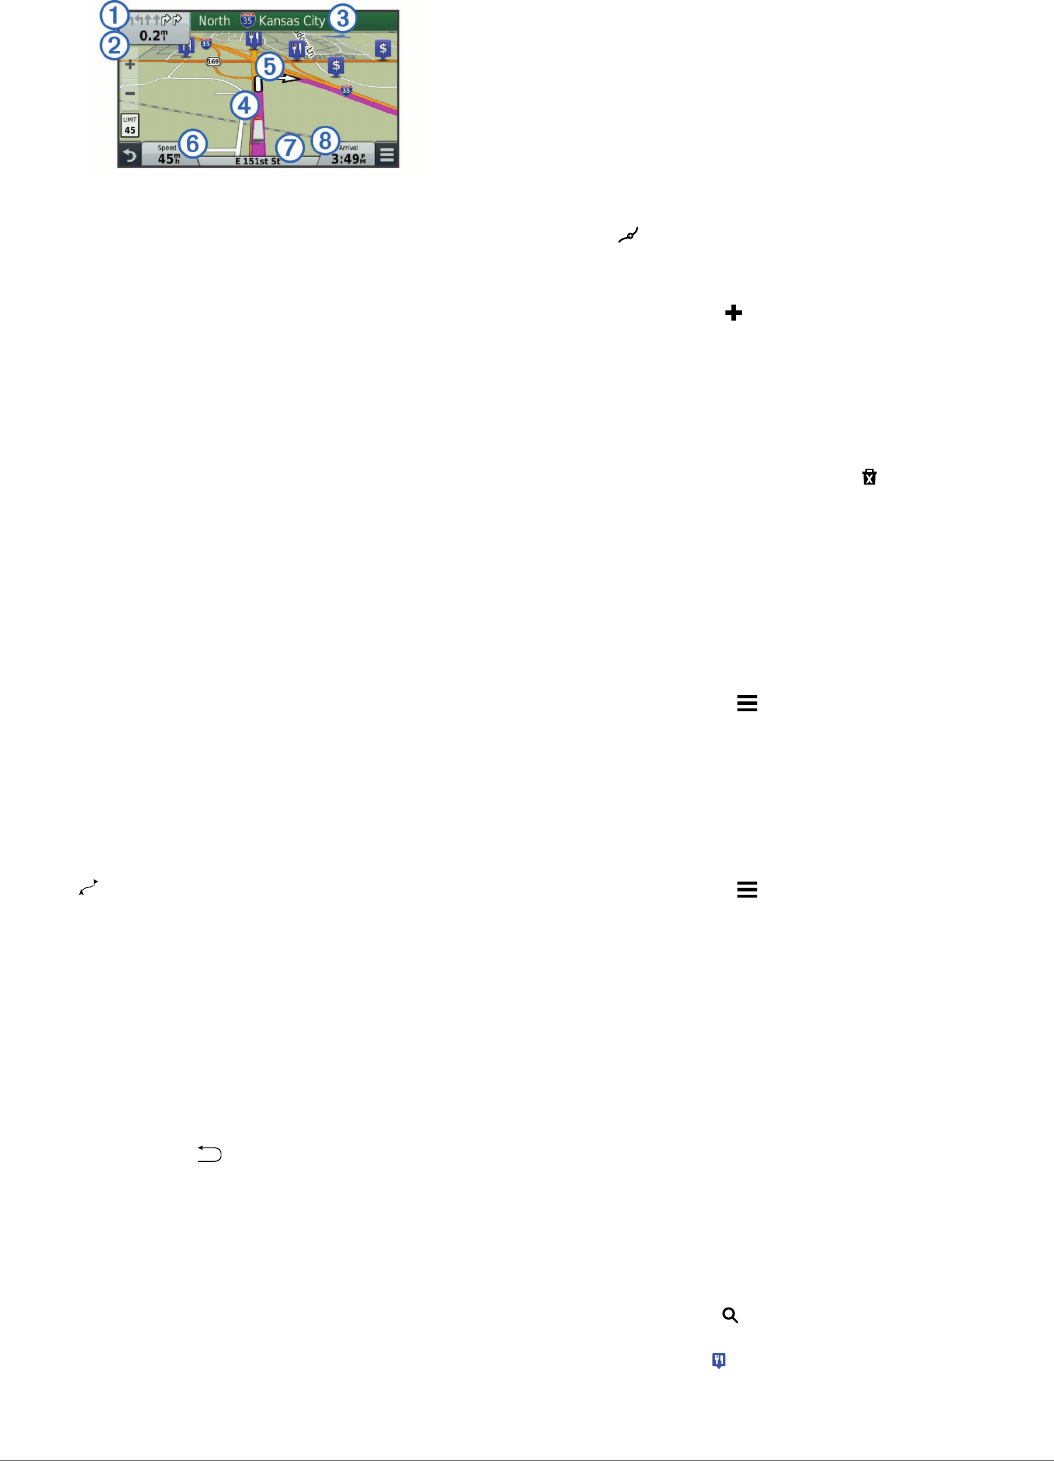
Instructions for your next turn or exit, or other action appear
across the top of the map. The symbol
À
indicates the type of
action and the lane or lanes in which you should be traveling, if
available. The device also displays the distance to the next
action
Á
and the name of the street or exit associated with that
action
Â
.
A colored line
Ã
highlights the course of your route on the map.
Arrows on the map
Ä
indicate upcoming turns. When you
approach your destination, a checkered flag indicates the
location of your destination.
Your vehicle speed
Å
, the road on which you are traveling
Æ
,
and your estimated arrival time
Ç
appear at the bottom of the
map. You can customize the arrival time data field to display
other information (Changing the Map Data Field, page 10).
A data field displaying the speed limit may appear as you travel
on major roadways. This feature is not available in all areas.
Active Lane Guidance
As you approach a turn while navigating a route, a detailed
simulation of the road appears beside the map, if available. A
colored line indicates the proper lane for the turn.
Viewing a List of Turns
While navigating a route, you can view all of the turns and
maneuvers for your entire route and the distance between turns.
1
While navigating a route, select the text bar on the top of the
map.
2
Select a turn.
The details for the turn appear. If available, an image of the
junction appears for junctions on major roadways.
Viewing the Entire Route on the Map
1
While navigating a route, select anywhere on the map.
2
Select .
Adding a Location to Your Route
Before you can add a location to your route, you must be
navigating a route (Starting a Route, page 2).
You can navigate to additional locations on the way to your
destination. For example, you can add a fuel station as the next
stop in your route. You can also add a location to the end of
your route.
TIP: To create complex routes with multiple locations or
scheduled stops, you can use the trip planner to plan, edit, and
save your route (Planning a Trip, page 4).
1
From the map, select > Where To?.
2
Search for a location (Finding Locations, page 5).
3
Select a location.
4
Select Go!.
5
Select an option:
• To add the location as the next stop in your route, select
Add As Next Stop.
• To add the location to the end of your route, select Add
As Last Stop.
• To add the location and adjust the order of locations in
your route, select Add to Active Route.
Your device re-calculates the route to include the added location
and guides you to the locations in order.
Shaping Your Route
Before you can shape your route, you must start a route
(Starting a Route, page 2).
You can manually shape your route to change its course. This
allows you to direct the route to use a certain road or go through
a certain area without adding a stop or destination to the route.
1
Touch anywhere on the map.
2
Select .
The device enters route shaping mode.
3
Select a location on the map.
TIP: You can select to zoom in on the map and select a
more precise location.
The device recalculates the route to travel through the
selected location.
4
If necessary, select an option:
• To add more shaping points to the route, select additional
locations on the map.
• To remove a shaping point, select .
5
When you are finished shaping the route, select Go!.
Taking a Detour
Before you can take a detour, you must be navigating a route
and you must add the change route tool to the map tools menu
(Enabling Map Tools, page 8).
You can take a detour for a specified distance along your route
or detour around specific roads. This is useful if you encounter
construction zones, closed roads, or poor road conditions.
1
From the map, select > Change Route.
2
Select an option:
• To detour your route for a specific distance, select Detour
by Distance.
• To detour around a specific road on the route, select
Detour by Road.
Stopping the Route
From the map, select > Stop.
Changing the Route Calculation Mode
1
Select Settings > Navigation > Calculation Mode.
2
Select an option:
• Select Faster Time to calculate routes that are faster to
drive but can be longer in distance.
• Select Off Road to calculate point-to-point routes (without
roads).
• Select Less Fuel to calculate routes that are more fuel-
efficient.
• Select Shorter Distance to calculate routes that are
shorter in distance but can take more time to drive.
Starting a Route by Using the Map
You can start route by selecting a location from the map.
1
Select View Map.
2
Drag and zoom the map to display the area to search.
3
If necessary, select to filter the displayed points of interest
by category.
Location markers ( or a blue dot) appear on the map.
4
Select an option:
• Select a location marker.
Navigating to Your Destination 3


