TM-A101G
1-5
No.51921
ENGLISH
EXIT
CHROMA MENU
PHASE BRIGHT
CONTRAST VOLUME/SELECT
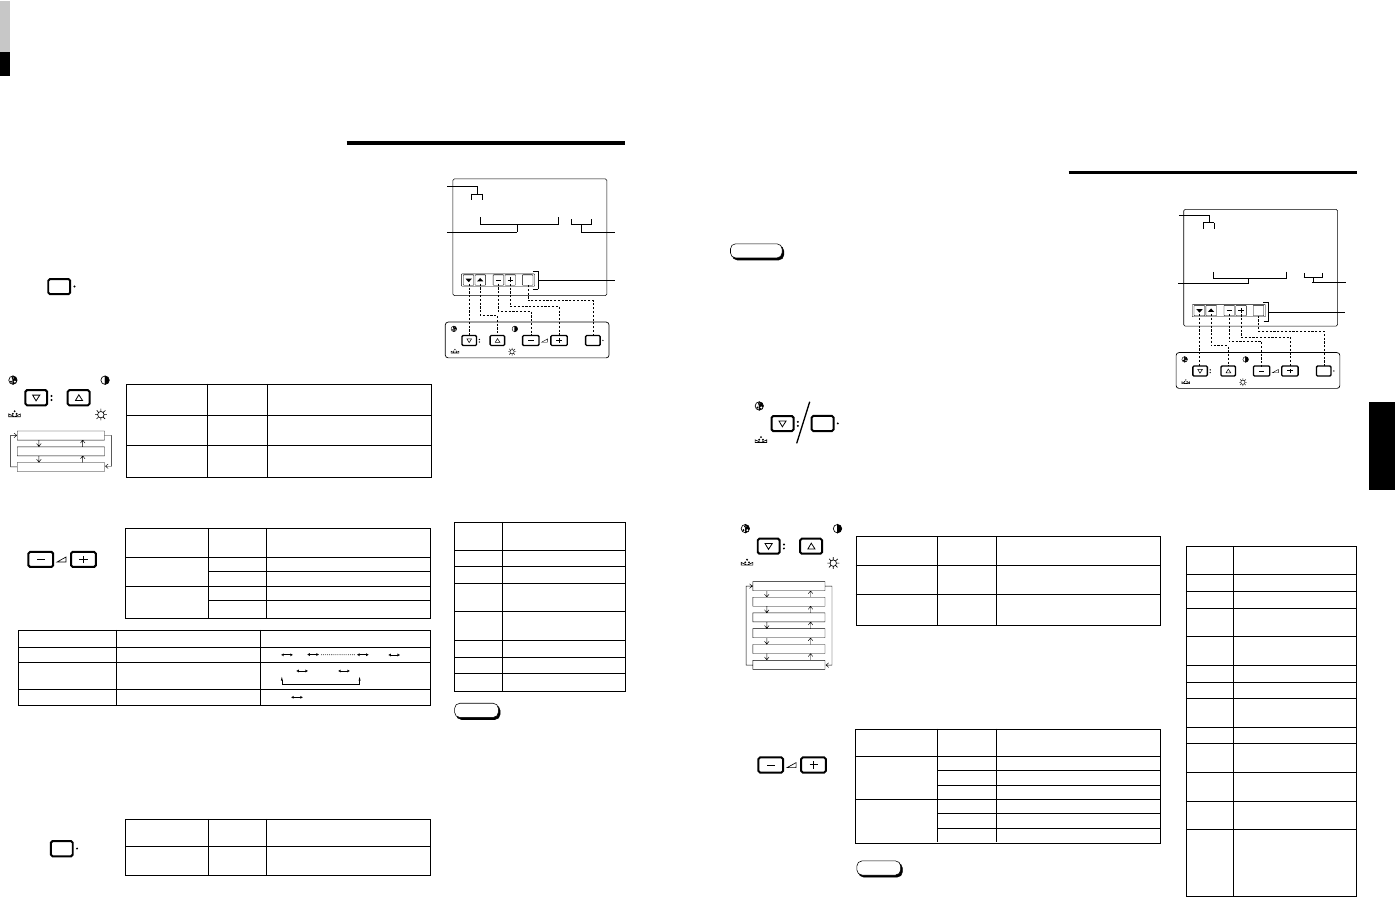
DISPLAY AND SELECTIONS IN THE <SET-UP
MENU> MODE (SETTING)
• H. POSITION • CONTROL LOCK • INPUT REMOTE
• WHITE BALANCE • STATUS DISPLAY • ASPECT REMOTE
You can set the following set-up menu items.
1. While pressing the MENU button, press the
CHROMA/PHASE button.
The <SET-UP MENU> screen is displayed.
2. Press the CHROMA/PHASE or CONTRAST/BRIGHT
button to select the desired menu item.
A selection mark (
4
) is put next to the selected item.
3. Press the VOLUME/SELECT buttons to set.
● To adjust the white balance, select WHITE BALANCE and
press the VOLUME/SELECT (+) or (–) button to display the
CUT OFF or DRIVE setting screen, then adjust each setting.
● Press the EXIT (MENU) button to return to the <SET-UP
MENU> screen.
Notes:
<SET-UP MENU> screen
<Front panel buttons>
1
Selection mark (
4
): Indicates the
menu item you select.
2
Menu item: Menu items you can
select.
3
Setting display: Indicates the
current settings (value).
4
Function display: The functions of
the front panel buttons (5 buttons
on the left) correspond to the
function displayed.
Function
Contents
displayed
ᮢ
Forward the menu item.
ᮡ
Reverse the menu item.
– Lower the adjustment
value. (to the minimum)
+ Raise the adjustment
value. (to the maximum)
4
Forward the setting value.
1
Reverse the setting value.
EXIT
Exit the <SET-UP MENU>
screen. (release)
DRV Selects DRIVE adjustment.
CUTO
Selects CUT OFF
adjustment.
RB
Adjusts red and blue
signal level.
RGB
Adjusts red, green and
blue signal level.
Turns the ON-SCREEN
display on or off. (This
DISP function is effective only
in the DRIVE or CUT OFF
adjustment mode.)
Front panel Function
Contents
button displayed
CHROMA/
ᮢ
Forward selection mark (
4
)
PHASE
CONTRAST/
ᮡ
Reverse selection mark (
4
)
BRIGHT
Front panel Function
Contents
button displayed
+ Increase (to max. value)
4
Forward the setting value
CUTO Selects CUT OFF setting screen
– Decrease (to min. value)
1
Reverse the setting value
DRV Selects DRIVE setting screen
VOLUME/
SELECT (–)
VOLUME/
SELECT (+)
● Parameter for H. POSITION can be set separately depending on the video input
(Input A (VIDEO) or Input B (VIDEO)) selected by the input select buttons on the front
panel.
Select the required video input with the input select buttons on the front panel in
advance.
Note:
<SET-UP MENU>
‰ H. POSITION : 00
WHITE BALANCE
CONTROL LOCK : OFF
STATUS DISPLAY : ON
INPUT REMOTE : OFF
ASPECT REMOTE : OFF
1
2
3
4
9
H. POSITION
WHITE BALANCE
CONTROL LOCK
STATUS DISPLAY
INPUT REMOTE
ASPECT REMOTE
MENU
CHROMA
PHASE
CHROMA
PHASE BRIGHT
CONTRAST
VOLUME/SELECT
EXIT
CHROMA MENU
PHASE BRIGHT
CONTRAST VOLUME/SELECT
<MENU >
‰ SHARPNESS : +03
COLOR SYSTEM :
AUTO
ASPECT RATIO : 4–3
Menu items Purpose Setting range
SHARPNESS Picture sharpness
COLOR
Color system
SYSTEM
ASPECT RATIO Aspect ratio
Front panel Function
Contents
button displayed
+ Increase (to max. value)
4
Forward the setting value
– Decrease (to min. value)
1
Reverse the setting value
VOLUME/
SELECT (–)
VOLUME/
SELECT (+)
Front panel Function
Contents
button displayed
CHROMA/
ᮢ
Forward selection mark (
4
)
PHASE
CONTRAST/
ᮡ
Reverse selection mark (
4
)
BRIGHT
Front panel Function
Contents
button displayed
MENU EXIT
Quit (or Release) the <MENU>
screen
1
2
3
4
HOW TO USE THE MENU FUNCTIONS
• SHARPNESS • ASPECT RATIO
• COLOR SYSTEM
You can set the following menu items.
Set them depending on your needs.
1. Press the MENU button.
The <MENU> screen is displayed.
2. Press the CHROMA/PHASE or CONTRAST/BRIGHT
button to select MENU items.
A selection mark (
4
) is put next to the selected item.
SHARPNESS
COLOR SYSTEM
ASPECT RATIO
3. Press the VOLUME/SELECT buttons to set.
4. If you want to set the other menu items, repeat
procedures 2 and 3.
5. Press the MENU button to quit.
1
Selection mark (
4
): Indicates the
menu item you select.
2
Menu item: Menu items you can
select.
3
Setting display: Indicates the current
settings (value).
4
Function display: The functions of
the front panel buttons (5 buttons on
the left) correspond to the function
displayed.
Notes:
● When the screen aspect ratio is set to
16 - 9 (16:9) in ASPECT RATIO, the
picture will be vertically reduced.
● When ASPECT REMOTE is set to
ON in the <SET-UP MENU> screen,
REMOTE is displayed in ASPECT
RATIO. ASPECT RATIO cannot be
set in the MENU when ASPECT
REMOTE is ON.
<MENU> screen
<Front panel buttons>
Function
Contents
displayed
ᮢ
Forward the menu item.
ᮡ
Reverse the menu item.
– Lower the adjustment
value. (to the minimum)
+ Raise the adjustment
value. (to the maximum)
4
Forward the setting value.
1
Reverse the setting value.
EXIT Exits the <MENU> screen.
DISPLAY AND SELECTION IN THE <MENU>
SCREEN MODE (SETTING)
00 +1 +04 +05
AUTO NTSC PAL
4 – 3 16 – 9
8
MENU
CHROMA
PHASE BRIGHT
CONTRAST
VOLUME/SELECT
MENU


