©2005 TRAC-RITE DOOR, INC.
OF BOTTOM ASSEMBLY
NOTE DIRECTION AND POSITION
Figure 3.
DO NOT allow persons to ride on forklift or other
hoisting equipment being used to lift the curtain
assembly into position. Do not permit any persons
to climb on ladders near the curtain assembly while it
is being hoisted. Should the curtain assembly slip,
SERIOUS INJURY or DEATH to persons standing on
ladders or riding on lifting equipment can occur.
WARNING
Page 4
OPTIONAL OPERATOR CAN BE INSTALLED ON
EITHER END OF DOOR ASSEMBLY.
NOTE!
Do NOT allow door assembly to roll off brackets or
move sideways off edge of bracket. If door falls,
serious injury or death and/or damge to door can
result.
WARNING
Figure 2.
2"
4
3
8
"
SIDE WITHOUT
OPERATOR
SIDE WITH
OPERATOR
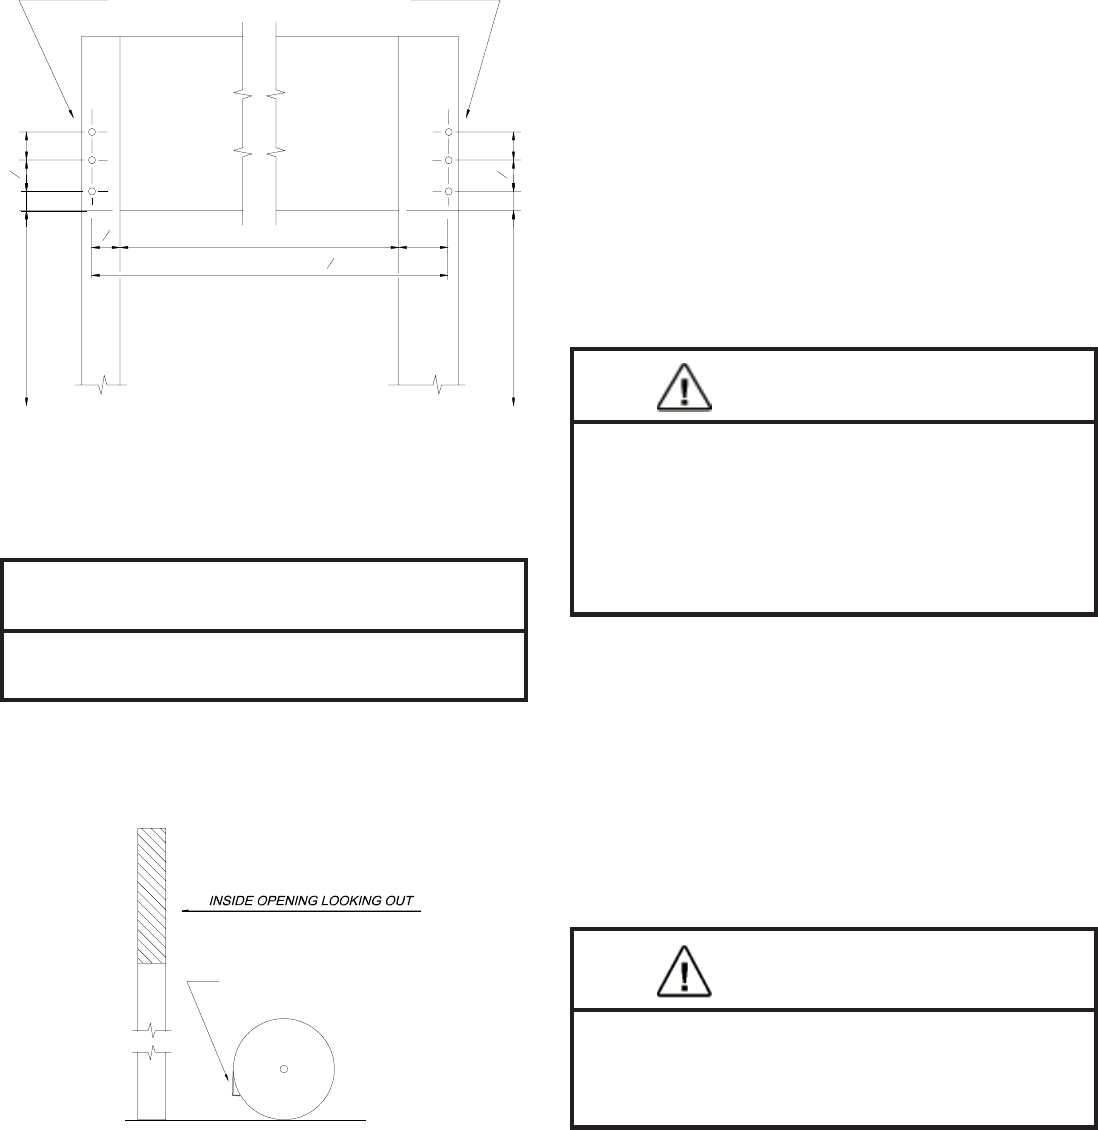
DOOR BRACKET HOLE LOCATIONS
OPENING WIDTH
OPENING WIDTH + 11
1
2
"
4
1
2
"
7"
4
3
8
"
OPENING HEIGHT
OPENING HEIGHT
2"
3"
3"
4.2 OPTIONAL REDUCED DRIVE SYSTEM Install the
sprocket on the preferred side of door assembly and secure
with 3- 3/8” x 1” bolts.
4.2.1 Slide the chain hoist assembly on the axle and align the
sprockets parallel to each other.
4.2.2 Connect the drive chain around both sprockets, using
the masterlink provided. Do not secure the chain hoist
assembly to the axle at this time.
4.3 Slide the axle saddle onto the axle after the chain hoist is
in place.
4.4 On the opposite side of the reduced-drive chainhoist,
slide the saddle with the tension device on the axle (tensioner).
Slide the axle saddle onto the axle on the side with the reduced-
drive chain hoist.
5. BRACKET MOUNTING:
5.1 Mount the Right and Left bracket according to the spacing
in Figure 2. Make sure there is enough spacing for the
reduced-drive chain hoist on the chosen side of the door
assembly. Fasten using the pre-drilled holes and fasteners
described in Section 3.
6. HOIST DOOR INTO OPENING:
6.1 Utilizing whatever method currently available (forklift, block
and tackle, etc.), hoist the door up over the mounted brackets.
Protect the door while lifting by padding the forks of the forklift.
6.2 Position the door on the brackets so the tensioner and
axle saddle rest safely on the top flange of the bracket. Make
sure arrows on the tensioner and axle saddle are pointing in
the correct direction.
6.3 Door should be positioned as close as possible to the
header and still be able to rotate and clear the bottom bar.
The door should also be centered in the opening.
diameter, and be constructed of ASTM A-307 steel or
greater.
• Door guide to jamb fasteners must be 1/4” in
diameter, and be constructed of ASTM A-307 steel or
greater.
3.3 Pre-drill jambs to accept door brackets; 7/16” diameter
holes for 3/8” nuts and bolts in steel jambs, proper size pilot
hole for 3/8” lag bolt in wood jambs. Hole locations are shown
in Figure 2. Do not pre-drill jambs for door guide installation.
NOTE: Door must be hung level to ensure proper tracking.
4. DOOR PRE-ASSEMBLY:
4.1 Position the door in the opening as shown in Figure 3. Be
sure to place the door on protective material to prevent
damage to the curtain.


