5
PhaserLink™ Upgrade for the Phaser 340 — Upgrade Kit Z340PL
Replacing the print engine ROM
5.
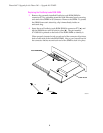
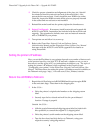
Locate the print engine ROM on the main board.
Note
Some products may use a standard ROM IC chip while others may
use an adaptor circuit board (as show in the illustration below).
Either part type can be substituted for the other on this main board.
Also note that there are two versions of the new print engine ROM:
If you ordered the upgrade kit Z340PL Option 1, you have the ROM
IC chip labeled 163-0646-00, for a Phaser 340 Plus.
If you ordered the upgrade kit Z340PL Option 2, you have the adaptor
circuit board ROM, labeled 671-3913-00, for a base Phaser 340.
6.
Insert the IC removal tool between the ROM (or adaptor board ROM)
and its socket.
GENTLY
remove the old part by prying upward, being
careful to not damage the main board. When the near end of the part
begins to lift from the socket, gently lift the other end of the part with
your fingers to prevent damage to the ROM’s pins. Remove the ROM.
To protect the ROM from static electricity, slip it immediately inside an
anti-static bag.
Note
Identify Pin 1 end of the adaptor board the square pads on the upper
surface of the board; alternately, you can identify the pin 1 end by the
notch in the pin array on the bottom-side of the board. Likewise, a
notch on the end of the ROM IC chip indicates the pin 1 end of the
chip.
7.
Support the main board from underneath by draping the metal back
panel of the board over the edge of a desk or table.
Z340-1-01
Print engine
ROM
Carefully pry ROM up
with IC removal tool
Orientation
Notch