


www.airkinglimited.com
A210952014 Rev. G 6-15 4 of 12
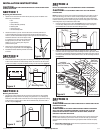
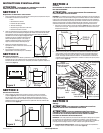
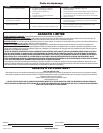
5. Install the reflector onto the grill by placing the slots on the side of the reflector over the
lens clips near the center of the grill. While squeezing the middle of the reflector, slide it so
that the plastic notches rest under the lens clips and the reflector feels secure (Figure 13).
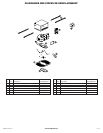
6. Install the grill (with reflector) by squeezing the two ends of the springs together and installing
them up into the slots on the fan’s housing. Push the grill up into position (Figure 14).
7. Restore power and test your installation.
SECTION 7
Use and Care
CAUTION: MAKE SURE POWER IS SWITCHED OFF AT SERVICE PANEL BEFORE
STARTING INSTALLATION.
1. Cleaning the Grill: Remove grill and use a mild detergent, such as dishwashing liquid,
and dry with a soft cloth. NEVER USE ANY ABRASIVE PADS OR SCOURING POWDERS.
Completely dry grill before reinstalling. Refer to instructions in Section 6 Finishing the
Installation, to reinstall grill.
2. Cleaning the Fan Assembly: Wipe all parts with a dry cloth or gently vacuum the fan.
NEVER IMMERSE ELECTRICAL PARTS IN WATER.
CAUTION: ALLOW BULBS TO COOL BEFORE REPLACING.
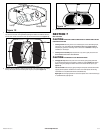
3. Changing the Lamp: Disconnect power to the unit. Remove grill by pulling downward
on grill and squeezing grill springs together to release from housing (Figure 13). Remove
Reflector from grill by sliding the reflector notches from beneath the lens clips on grill.
(Figure 12).
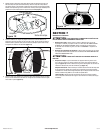
Fluorescent Bulb: Remove lamp by gently twisting the lamp base counterclockwise while
applying outward pressure. Installation is the reverse of removal. Replace with Air King
model 26SBL or a compatible GU24 26 watt self ballasted lamp.
Night Light: Unscrew night light bulb from socket and replace with a 4 watt maximum type
C7 (candelabra base) night light bulb.
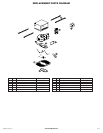
Figure 14
Figure 12
Lamp
Lamp Holder
Pin
Night Light
Socket
Slot
Clip
Figure 13