


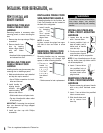
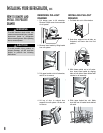
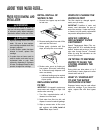
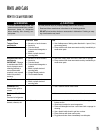

1. Unplug power cord from power
source.
2. Remove toe
grille and bot-
tom bracket
cover.
• Open freezer door
(some models) as wide as possible.
3. Remove top hinge
cover from refriger-
ator door by remov-
ing Phillips screw
(non-trim models
only).
• Retain screw and cover for replace-
ment.
4. Remove top door trim with Phillips
screw (trim models only).
• Retain screw and trim for replace-
ment.
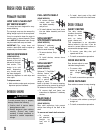
5. Unscrew
5
Ú16" hex
head screws from
top hinge to
remove hinge.
• Retain hinge and all screws for later
use.
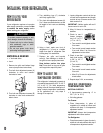
6. Lift refrigerator door from center hinge
pin.
7. Remove center
hinge pin with a
5
Ú16" hex nut driver.
• Retain hinge pin
for later use.
8. Remove Phillips
screws to remove
center hinge.
• Retain hinge and all screws for later
use.
9. Remove both stabilizing brackets with
3
Ú8" hex head driver.
•Retain screws and brackets for later
use.
4
Installing your refrigerator
These instructions were provided to aid
you in the installation of your refrigerator.
Amana is not responsible for improper
installation.
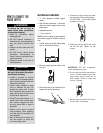
Measuring the opening
A
1
Ú2" of air space should be provided for
the top and back of the unit to allow for
proper air circulation. When installing
your unit, measure carefully.
Subflooring or floor coverings (i.e. carpet,
tile, wood floors, rugs) may make your
opening smaller than anticipated.
Some clearance may be gained by using
the leveling procedure under How to
Level Your Refrigerator.
IMPORTANT: If unit is to be installed into
a recess where top of unit is completely
covered, use dimensions from floor to top
of hinge cap to verify proper clearance.
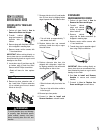
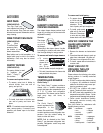
Transporting your
refrigerator
Follow these tips when moving the unit to
final location:
➢ NEVER transport unit on its side. If an
upright position is not possible, lay unit
on its back. Allow unit to sit upright for
approximately 30 minutes prior to
plugging unit in to assure oil return to
the compressor. Plugging unit in
immediately may cause damage to
internal parts.
➢ Use an appliance dolly when moving
unit. ALWAYS truck unit from its
side–NEVER from its front or back.
➢ Protect outside finish of unit during
transport by wrapping cabinet in blan-
kets or inserting padding between the
unit and dolly.
➢ Secure unit to dolly firmly with straps
or bungee cords. Thread straps
through handles when possible. DO
NOT overtighten. Overtightening
restraints may dent or damage outside
finish.
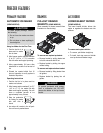
Selecting the best
location
Observe these points when choosing the
final location for your unit:
➢ DO NOT install refrigerator near oven,
radiator or other heat source. If not
possible, shield unit with cabinet
material.
➢ DO NOT install where temperature
falls below 55° F (13° C). Malfunction
may occur at this temperature.
➢ Make sure floor is level. If floor is not
level, shim rear wheels of unit with a
piece of plywood or other shim material.
➢ To assure proper door closure, verify
that the unit is leveled with a
1
Ú4" tilt to
the back.
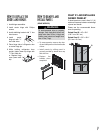
How to remove the
doors and hinges
Some installations require door removal
to get refrigerator to final location.
To avoid electrical shock which can
cause severe personal injury or death,
observe the following:
➢ Disconnect power to refrigerator
before removing doors. Connect
power only after replacing doors.
WARNING
To avoid damage to walls and flooring,
protect soft vinyl or other flooring with
cardboard, rugs or other protective
material.
CAUTION