


7
INSTINST
INSTINST
INST
ALLAALLA
ALLAALLA
ALLA
TION INSTRTION INSTR
TION INSTRTION INSTR
TION INSTR
UCTIONSUCTIONS
UCTIONSUCTIONS
UCTIONS
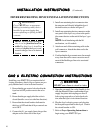
Install the fryer in accordance with the preceding
Code Requirements, as well as the following
Installation Requirements.
1. DO NOT install this fryer in a mobile home,
trailer, or recreational vehicle.
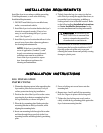
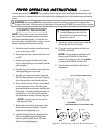
2. Install this fryer in a location that has the fryer’s
electrical receptacle
nearby (5 feet or less
away) to avoid straining the fryer’s power
cord. (See Figure 2.)
3. Install this fryer in a location that allows it to be
moved away from other adjacent appliances
for cleaning and maintenance.
NOTE: If the fryer is installed among
a row of appliances (“banked”), with
its only convenient movement forward,
sufficient room must be available in
front of the fryer to permit its separa-
tion from adjacent appliances for
cleaning and maintenance.
INSTINST
INSTINST
INST
ALLAALLA
ALLAALLA
ALLA
TION REQTION REQ
TION REQTION REQ
TION REQ
UIREMENTSUIREMENTS
UIREMENTSUIREMENTS
UIREMENTS
4. Tightly fasten the legs (or casters) to the bot-
tom of the fryer using the supplied hardware, to
prevent the fryer from tipping, wobbling or
rocking when it is in its desired location. Refer
to the following Leg Installation Instructions
or Caster Installation Instructions for leg
or caster attachment and leveling information.
5. Confirm that the air from the ventilation hood
flowing near the fryer
after installation is NOT
blowing on the rear of the unit, to prevent
affecting the burner flames and possibly causing
damage to plastic parts.
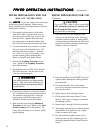
!
CACA
CACA
CA
UTION:UTION:
UTION:UTION:
UTION: Hood make-up air
MUST NOT flow in a manner that
restricts or impedes the natural flow
of combustion or ventilation air.
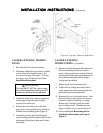
LEG INSTALLATION
INSTRUCTIONS
1. Flatten the shipping carton (after unpacking the
fryer and its parts and accessories) for fryer
surface protection during leg installation.
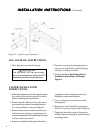
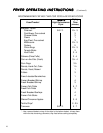
2. Position the side of the fryer flat on the carton,
exposing the fryer bottom mounting brackets
for leg installation, as shown in Figure 3.
3. Place the leg mounting plate flush against the
mounting bracket on the fryer bottom, while
aligning the mounting holes.
4. Insert one mounting bolt through a flat washer
and then through the proper hole in the fryer
mounting bracket and through the leg mounting
plate.
5. Screw a locking nut several turns onto the
mounting bolt.
6. Repeat steps 4 and 5 until all four mounting
bolts for a leg are in place with locking nuts.
7. Tighten the four locking nuts evenly and se-
curely to hold the leg mounting plate against the
fryer bottom mounting bracket.