


5
5
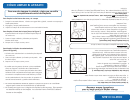
To Cook Soups and Stews:
1. Add ingredients to inner pot and place pot in rice cooker.
2. Press down on the power switch. The “Cook” light will illuminate.
3. Allow soup to cook until ready, stirring often.
4. When soup is finished cooking, lift up the power switch to use the “Keep-
Warm” mode. The “Warm” light will illuminate.
5. Rice cooker will remain in “Keep-Warm” mode until it is unplugged. Be sure
to unplug the unit from the wall outlet when it is not in use.
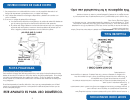
To Steam Food:
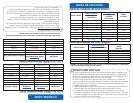
1. When steaming only, add the appropriate amount of water to the inner pot
according to the food to be cooked. Convenient steaming guides have
been provided on page 8 and 9 for reference.
2. Place food into the steam tray. Smaller foods may be placed in a heat-proof
dish and then placed into the steam tray.
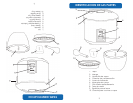
3. Making sure that the outside surface of the inner pot is completely clean and
dry, set the inner pot into the body of the rice cooker then place the steam
tray on to the inner pot. Place the lid over the top and plug the power cord
into a wall outlet.
4. Press down on the power switch. The “Cook” light will illuminate.
5. When steaming is complete, the unit will automatically switch to “Keep-Warm”
mode. We recommend keeping food on “Keep-Warm” mode no longer than
5-10 minutes to avoid over cooking.
6. The rice cooker will remain on “Keep-Warm” mode until it is unplugged. Be
sure to unplug the cord from the wall outlet when not in use.
HELPFUL HINTS:
1. Rinse rice before placing into the inner pot to remove excess bran and
starch. This will help reduce browning and sticking to the bottom of the
pot.
2. If you have experienced any sticking with the type of rice you are using, try
adding a light coating of vegetable oil or nonstick spray to the bottom of
the inner pot before adding rice.
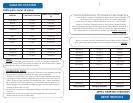
3. The chart on page 7 is only a general measuring guide. As there are many
different kinds of rice available (see “About Rice” on page 12), rice/water
measurements may vary slightly.
Para cocer alimentos al vapor:
1. Coloque la rejilla para vapor dentro de la olla interior.
2. Coloque los alimentos en la rejilla, si es que caben allí, o póngalos en un tazón a
prueba de calor y luego coloque el tazón sobre la rejilla dentro de la olla arro-
cera.
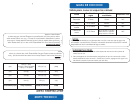
3. Agregue la cantidad de agua deseada a la olla interior. En las páginas 8 (para
vegetales) y 9 (para carne) aparece unas guías útiles para cocer al vapor.
4. Asegúrese de que la superficie exterior de la olla está completamente seca y
limpia. Coloque la olla interior en el cuerpo de la arrocera y ponga la tapadera
de vidrio encima de la arrocera.
5. Presione el interruptor hacia abajo, al modo de cocimiento ("cook").
6. Cuando haya terminado el cocimiento al vapor, la arrocera cambiará
automáticamente al modo de calentamiento ("warm"). Se recomienda que no
deje los alimentos en el modo de calentamiento más de 5 a 10 minutos para
evitar que se sobrecuezan.
7. La arrocera permanecerá al modo de calentamiento hasta que el enchufe sea
desconectado de la tomacorriente. Siempre desenchúfe la arrocera después
de usarla.
Para cocer sopas y guisados:
1. Agregue los ingredientes a la olla inerior y colóquela en la arrocera.
2. Presione el interruptor hacia abajo, al modo de cocimiento (“cook”).
3. Dejar la sopa a cocer hasta que sea lista, agitando de menudo.
3.
Levante el interruptor hacia hacia arriba después de cocer. La arrocera cam-
biará al modo de calentamiento ("warm")
4.
La arrocera permanecerá al modo de calentamiento hasta que el enchufe sea
desconectado de la tomacorriente. Siempre desenchúfe la arrocera después de
usarla.
CONSEJOS ÚTILES:
1. Enjuague el arroz para quitarle el exceso de salvado y almidón. Esto evi-
tará que el arroz se queme o se pegue en el fondo de la olla.
2. Si se le está pegando el arroz debido al tipo de arroz que está usando,
intente agregar una ligera capa de aceite vegetal o rocío (spray) antiad-
herente al fondo de la olla interior antes de agregar el arroz.
3. La tabla es sólo una guía general de medición. Puesto que existe una
gran variedad de clases de arroz en el mercado (véase “Acerca del
Arroz“ en la página 12), las medidas de arroz/agua pueden variar l
igeramente.
HOW TO USE
INSTRUCCIONES DE USO