


INSTALLATION INSTRUCTIONS
Minimum Clearance for Installation
From combustible or non-combustible construction:
Right side, Left side and Back: 3” (76mm)
!LOCATION
Due to the heat a counter-top oven may produce, it must be placed on a non-combustible
surface. Do not store combustible materials on top of any oven.
!ELECTRICAL CONNECTIONS
Suitable means, which will disconnect all ungrounded conductors of the circuit simultaneously,
must be provided by the installer.
Make sure electrical supply corresponds with that specified on the rating plate located in the rear
of the oven.
When installed, the unit must be connected by an earthing cable to all other units within the
complete installation and thence to an independent earth connection.
Use copper conductors only, rated at 90° C.
If a line cord is used for the installation of the unit in Europe, it should be a minimum of H07RN-F
type conforming to EN60 335-1 and/or local codes.
Use minimum conductor size as below:
!For models PX-14, PX-16, P-18, BK-18 and P-24S:
14 Gauge (1.5mm) for 220-240V, single phase supply.
!For models P-22S, P-22BL, P-44S, P-44BL, P-46S, P-48S and DP-2:
10 Gauge (2.5mm) for 220-240/380-415V, 3 phase supply.
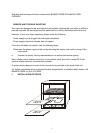
!REQUIREMENTS FOR INSTALLATION
For portable units (Model PX-14 and PX-16) there are no special requirements.
For shipping purposes the 4” (100mm) legs are not mounted. For mounting legs, follow steps a.
through g.
a. Remove the outer shipping carton and paper and place the oven on the floor or other flat
surface.
b. Remove legs, baking decks and any other materials from inside the unit.
c. With sufficient help, tilt the unit back far enough to mount the two front legs and tighten
with an adjustable wrench.
3