


Automatic Lift Fryer Operation
14
3. The digital timer has a STIR OIL function that operates in one of four reconfigurable modes. If the
timer needs to be reconfigured, follow step a. If the timer does not need to be reconfigured, follow
step b.
a. Press and hold the ALARM button and at the same time place the FILTER/OFF/FRY switch
in the FRY position. The display will show the word “STIR” until the ALARM button is
released. When the button is release the display will show the current configuration mode.
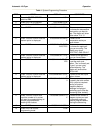
To change this mode select the timer key that represents the mode you want. Refer to the
table below:
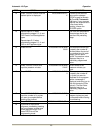
KEY DISPLAY MODE DESCRIPTION
A -AL-
New or unchanged timer. Alarm sounds at the end of the internal 6
minute countdown.
B -OFF
Defeats the STIR OIL function. Timer operates as if it had no STIR
OIL function.
C PrES STIR OIL function for all Pressure Fryers.
D LiFT STIR OIL function for all Autolift Fryers.
The display will now show the selected mode. Proceed to step c.
b. Once the fryer is filled with shortening, place the FILTER/OFF/FRY switch in the FRY
position.
c. Unless the STIR OIL function is operating in the –OFF mode, the digital timer activates a
STIR OIL function and begins an internal six minute countdown (not displayed). At the end
of the internal countdown, the display shows the words “STIR” then “OIL” in .5 second
intervals and the alarm sounds. Depress the ALARM button and stir the shortening freely
while it is heating.
IMPORTANT! Before the first cooking operation each day, stir the shortening freely while it
is heating to provide a balanced shortening temperature for excellent results with the first
cooking. Failure to do this can result in a crusty skin on the product surface with an
undercooked product internally. In addition, in some cases, failure to stir the shortening
while it is initially heating may cause the HI-LIMIT safety device to disable the power due to
a false overtemperature condition.
4. Set the thermostat to the desired cook temperature. The temperature light will go on. When the
temperature is reached, the light will go off. The light will continue to cycle on and off as the fryer
maintains the set temperature.
5. Raise the basket to the top position by depressing the basket switch to the BASKET UP position.
6. Press and hold the TIME SELECT arrow buttons on the digital timer until the desired cook time is
displayed or recall a preset time by quickly pressing the appropriate preset button.
7. The shortening will heat and begin to reach the fill mark inside the pot. Add more shortening as
required to reach the fill mark.
Cooking
1. Ensure that the Start-Up procedures have been performed.
2. When frying chicken, lower the basket into the shortening by depressing the basket switch to the
BASKET DOWN position.
Hot shortening may splash out of the pot causing severe injury when dropping
chicken into pot. Carefully drop pieces of chicken into pot to prevent shortening
splashes.