


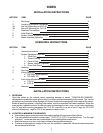


MINIMUM CLEARANCES
COC-E1 CO11-E1
Inches mm Inches mm
Right 1 25 1 25
Left 1 25 2 50
Rear 1 25 1 25
Suitable for installation on combustible floors when installed on factory supplied legs or casters.
3A.SET-UP / MOUNTING FOR COC-E1
Counter-top installation must conform to one of the following methods:
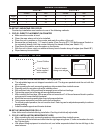
1. COC-E1: DIRECT PLACEMENT ON COUNTER
a. Make sure the counter is level.
b. Clean the area where unit is to be installed.
c. Place the unit in position on the counter and mark the outline of the unit.
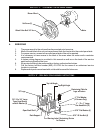
d. Remove the unit and apply 1 ¼” bead of sealer (Dow Corning RTV 732 Multipurpose Sealant or
its equivalent) directly onto the counter following the traced outline (see Sketch “A”).
e. Place the unit in position, over the sealer, on the counter.
f. With the unit in place, apply an additional heavy bead of sealer along all edges (see Sketch“B”).
g. Wipe clean any excess sealer.
3
Traced Outline
1 1/4” Bead of
sealer applied
onto counter
SKETCH “A” - TOP VIEW
BAKERS PRIDE
Bead of sealer
along oven edges
SKETCH “B” - FRONT VIEW
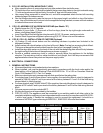
2. COC-E1: INSTALLATION / MOUNTING 6” LEGS (Optional)
a. The adjustable legs are not shipped mounted to unit. The legs are packed inside the unit with the
wire shelves.
b. After unpacking the unit, remove legs and any other material from inside the oven.
c. Place the unit on a counter or other flat, stable surface.
d. With sufficient help, tilt the unit back far enough to mount the two front legs.
e. Tighten the upper part of the leg with an adjustable wrench.
f. After installing the front legs, lift the rear of the unit more than 6” off the surface and block in position
using wood or some other solid material.
g. Mount the two rear legs and tighten them in the same fashion.
h. Using proper equipment, move the unit to its final location.
i. To ensure proper operation, the unit must be level. Each leg can be adjusted separately to achieve
proper leveling.
j. Install the shelf supports and the wire shelves.
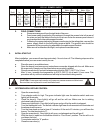
3B SET-UP / MOUNTING FOR CO11-E
Note: Units must be leveled after leg installation. Each leg is individually adjustable.
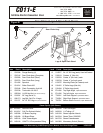
1. CO11-E1: INSTALLATION / MOUNTING 30” LEGS
a. After unpacking the unit, remove legs and any other material from inside the oven.
b. Tilt the oven onto its left side and attach the two right legs using three ½” bolts and washers for each
leg. Tighten firmly.
c. Use proper lifting equipment to raise the unit, and while suspended attach the two left legs in the
same manner.