


INDEX
INSTALLATION INSTRUCTIONS
SECTION ITEM PAGE
1 Receiving 2
2 Location & Minimum Clearances 2
3A Set-Up & Mounting for COH-E1 3
3B Set-up & Mounting for CO1-E 3
4 Electrical Connections
4
5 Initial Start Up 5
6 System Check & Rotary Controls 5
7 Steam Injection (Optional)
6
OPERATING INSTRUCTIONS
SECTION ITEM PAGE
1 General Instructions
6
2 System Operation Sequence 6
1. Cook Only 6
2. Timed Cooking 6
3. Cook & Hold 7
4. Steam Injection (Optional) 7
5. Oven Cool Down 7
3 Cleaning 8
4 Servicing 9
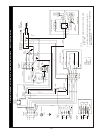
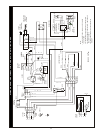
5 Wiring Diagrams 10
a. 208-240V North America 10
b. 230-400V CE 11
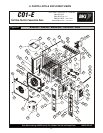
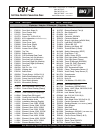
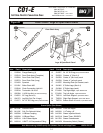
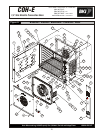
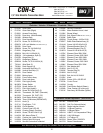
6 Parts Lists w/Exploded Views 12
a. CO1-E Parts List w/Exploded View 12
b. COH-E Parts List w/Exploded View 15
7 Warranty 19
2
INSTALLATION INSTRUCTIONS
1. RECEIVING
Read the notice on the outside carton regarding damage in transit. “CONCEALED DAMAGE”,
damage discovered after opening the crate(s), must be reported immediately to the carrier. The carrier
will perform an inspection of the damage and furnish forms for the consignee's claim against the carrier.
Retain all packing material
- including outer carton until the inspection has been completed. When the
oven arrives, it should consist of: A crate (or carton) containing your new oven, and a carton containing
four 30” legs with mounting hardware (for CO1-E1 oven only) or a set of four 6” legs (for CO1-E2
stacked
installations). Legs for COH-E are packed inside the oven.
2. LOCATION & MINIMUM CLEARANCES
a. Adequate air space must be provided for proper venting of the motor and the controls.
b. The oven should be located no closer than 1” (COH-E) / 2” (CO1-E) on the left side, 1” on the right
side and 1”
on the rear from any combustible or non-combustible construction.
c. Keep the area around your oven free and clear of combustible materials.
d. Provision of adequate air supply to the oven for ventilation is essential. Minimum clearances must
be maintained at all times.