


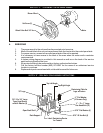
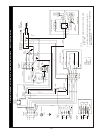
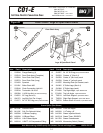
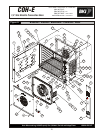
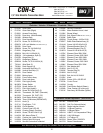

7. STEAM INJECTION OPTION
The solenoid valve for steam injection is mounted behind the service panel on the right hand side of
the unit on COH-E and on the back of the unit on CO1-E. It is pre-wired at the factory. The electronic
timer is pre-set at the factory.
A ¼” copper tubing
with a compression fitting for water connection is provided on the solenoid
valve. Be sure to check for leaks after installation.
6
! !
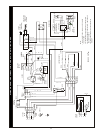
IMPORTANT: The oven will begin to heat as soon as the door(s) is/are closed,
the oven temperature is lower than the temperature set and the selector switch
is in the “High” or “Low” cook position.
The thermostat indicator light will turn on and stay on while the oven is heating
up,
and will turn off when the set temperature has been reached.
The door(s) interlock switch will deactivate the motor and heating elements and
turn on the light when the door(s) is/are opened.
OPERATING INSTRUCTIONS
1. GENERAL INSTRUCTIONS
a. This equipment has an electronic temperature control.
b. Due to increased efficiency of this oven, the temperature required for standard recipes may
be reduced 50°F (30°C).
c. Always load each shelf evenly and space pans away from each other and the back and
sides of oven to allow for maximum airflow around the product.
d. Large tempered glass window(s) and interior light(s) allow for a close check of the product
making it unnecessary to open the door(s) too frequently.
e. Products cook faster in a convection oven as compared to a conventional oven, therefore,
depending upon the product and type of pans used. Time saving may range
anywhere from
20% to 50%.
2. SYSTEM OPERATING SEQUENCE
1. COOK ONLY ROTARY CONTROL
a. Close the oven door(s).
b. Turn selector switch to “High” or “Low” position. The green indicator light near the
selector switch will be illuminated.
c. Turn the thermostat knob to the desired cooking temperature.
d. Upon reaching the set temperature, the amber indicator light near the thermostat will
turn off.
e. Load the oven with the product
to be cooked.
f. Remove the product from the oven when done.
2. TIMED COOKING ROTARY CONTROL
a. Close the oven door(s).
b. Turn selector switch to “High” or “Low” position. The green indicator light near the
selector switch will be illuminated.
c. Turn the thermostat knob to the desired cooking temperature.
d. Upon reaching the set temperature, the amber indicator light near the thermostat will
turn off.
e. Load the oven with the
product to be cooked.
f. Turn the timer knob to the desired bake time and timer will begin counting down.
g. When the timer reaches zero, a buzzer will sound.
h. Turn the timer knob to “0” position.
I. Remove the product from the oven.