


3
INSTALLATION INSTRUCTIONS
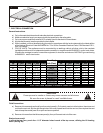
MODELS COVERED
MODEL NUMBER OF ELEMENTS TOTAL KW PHASE
EP1(2,3)-8-3836 8 elements per Deck 8 kw per Deck 1 or 3 phase
EP1(2,3)-8-5736 12 elements per Deck 12 kw per Deck 1 or 3 phase
EB1(2,3)-8-3836 8 elements per Deck 8 kw per Deck 1 or 3 phase
EB1(2,3)-8-5736 12 elements per Deck 12 kw per Deck 1 or 3 phase
ER1(2,3)-12-3836 8 elements per Deck 8 kw per Deck 1 or 3 phase
ER1(2,3)-12-5736 12 elements per Deck 12 kw per Deck 1 or 3 phase
1. RECEIVING
2. LOCATION AND MINIMUM CLEARANCES
Adequate air space must be provided for proper venting of the controls and provisions must be made for venting of the
cooking vapors. The Oven must be installed in a well-ventilated area and following minimum clearances must be
maintained at all times:
Ovens can be installed with “Zero” clearances (back and sides) from combustible and non-combustible materials.
The Ovens may be installed on combustible Flooring if mounted on the Legs provided. Keep the area around your
oven free and clear of all combustible materials.
3. INSTALLATION
Place the oven and parts as close to the area of final installation before uncrating. Your oven is packed sitting on its
back. Leave it on its back while unpacking. The pallet may be left under the oven for convenience in further handling.
Unpack carefully to avoid damage to the oven. If concealed damage is discovered, follow the instructions detailed in
section 1 above.
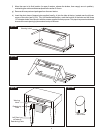
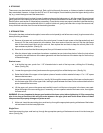
a) Legs are shipped in a separate carton complete with mounting bolts and washers. Firmly bolt two legs (in case
of casters, the two with the brakes must be used here) to the upper two corners (front) of the oven as it rests on
the pallet. Note: (See fig. # 1).
b) Using sufficient help, tilt the oven forward and lower it down so that the two front legs come to rest on the floor.
(See fig. 2)
WARNING: In case of casters, the brakes must be firmly applied and in a locked position before proceeding
with the next step, in order to prevent the oven from rolling away while lifting the back. It is advisable to have a
person in front of each caster leg, bracing his foot firmly against the casters.
c) Using proper lifting equipment, raise the back of the oven to a height slightly more than the height of the legs,
remove the pallet and the rest of the packing material and place a sturdy support under the back side. (See fig.
#3)
d) Mount the two back legs and firmly tighten the bolts, then lift the back of the oven somewhat and remove the
support.
e) Provide a suitable restraining chain or cable to securely tether the appliance to the building structure. The
restraining chain or cable should be of such length that it will stop movement of the appliance BEFORE there is
any strain on the power supply cable.
Read the notice on the outside carton regarding damage in transit. “CONCEALED DAMAGE”, damage discovered
after opening the crate(s), must be reported immediately to the carrier. The carrier will perform an inspection of the
damage and furnish forms for the consignee's claim against the carrier. Retain all packing material - including outer
carton until the inspection has been completed.