


- 7 -
•If your appliance does not have the INTENSIVE speed func-
tion, press key E for two seconds and it will be activated for 10
minutes after which it will return to the previously set speed.
When the function is active the LED ashes. To interrupt it
before the 10 minutes have expired press key E again.
• By pressing key F for two seconds (with the hood switched
o ) the “clean air” function is activated. This function switches
the appliance on for ten minutes every hour at the rst speed.
As soon as this function is activated the motor starts up at
the rst speed for ten minutes, During this time key F and key
C must ash at the same time. After ten minutes the motor
switches o and the LED of key F remains switched on with
a xed light until the motor starts up again at the rst speed
after fty minutes and keys F and C start to ash again for ten
minutes and so on.
By pressing any key for the exclusion of the hood light the
hood will return immediately to its normal functioning (e.g.
if key D is pressed the “clean air” function is deactivated and
the motor moves to the 2nd speed straight away. By pressing
key B the function is deactivated).
(*) The “AUTOMATIC STOP TIMER” delays stopping of the
hood, which will continue functioning for 15 minutes at the
operating speed set at the time this function is activated.
•Activecarbon/greaseltersaturation:
- When button A ashes at a frequency of 2 seconds, the
grease lters must be cleaned.
- When button A ashes at a frequency of 0.5 seconds, the
carbon lters must be replaced.
After the clean lter has been replaced, the electronic memory
must be reset by pressing button A for approximately 5 sec-
onds, until the light on the button stops ashing.
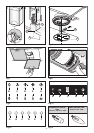
•Commands:(Fig.11)
Push-button A = on/o lights switch.
Push-button B = on/o cooker hood switch. The appliance
switches on at speed level 1, If the cooker hood is on depress
the push-button for 2 sec. to switch o the cooker hood. If
the cooker hood is at speed level 1 it will not be necessary
to depress the push-button to switch the cooker hood o.
Decreases the motor speed.
Display C = indicates the motor speed level selected and
activates the timer.
Push-button D = switches on the cooker hood. Increases the
motor speed. Touching the key at 3rd speed, the intensive
function runs for 10’, then the appliance go back to work at
the original speed. During this function the display blinks.
Key E = The Timer times the functions on activation for 15
minutes, after which they are switched o. The Timer is deac-
tivated by re-pressing Key E.
When the Timer is activated the decimal point must ash on
the display. The Timer cannot be activated if the intensive
speed is functioning.
The “clean air” function is activated by pressing key E for 2
seconds when the appliance is switched o. This switches the
motor on for 10 minutes every hour at the rst speed.
During functioning a rotary movement of the peripheral seg-
ments must be visualised on the display. When this time has
passed the motor switches o and the xed letter “C” must
be visualised on the display until the motor re-starts after 50
minutes for another 10 minutes and so on.
Press any key apart from the light keys to return to normal
functioning. Press key E to deactivate the function.
•Activecarbon/greaseltersaturation:
- When display item C ashes, at a speed where it alternates
with the letter F (e.g. 1 and F), the grease lters must be
washed.
- When display item C ashes, at a speed where it alternates
with the letter A (e.g. 1 and A), the carbon lters must be
replaced.
After the clean filter has been positioned correctly, the
electronic memory must be reset by pressing button A for
approximately 5 seconds, until the indication F or A shown
on the display C stops ashing.
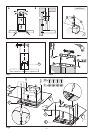
•FILTERREMOVAL
WARNING - ENSURE THE APPLIANCE IS SWITCHED OFF AT
THE MAINS BEFORE REPLACING THE BULBS AND FILTERS.
1. remove the filters by lifting the recessed handle and lift
free from the hood frame.
2. To reinstall the filters position in the recess at the rear and
press to lock in position.
BULB REPALCEMENT
1. Remove the filters
2. Unscrew the bulb in an anti-clock wise direction.
3. After installing the correct replacement bulb, refit the
filter.
Replacement bulbs can be easily obtained from a good electri-
cal or DIY store.
BEFORE CALLING SERVICE/TROUBLE SHOOTING
The hood was switched on but the unit does not operate.
• Have you plugged in/switched on the power supply at
the socket?
• Check for a blown fuse/or trip.
Extraction is poor
• Check and clean the lters if required, if required, if ac-
tive lters are present replacement lters maybe required.
• Check that the exhaust ducting is not obstructed.
THE MANUFACTURER DECLINES ALL RESPONSIBILITY
FOR EVENTUAL DAMAGES CAUSED BY BREACHING THE
ABOVE WARNINGS.