


EN
12
REVERSING THE DOOR
We recommend that you reverse the
door before switching on for the first
time.
Tools required: Small and medium size
flat and cross-headed screwdrivers, a
pair of pliers. Spare Parts supplied in
the plastic bag: The following parts,
which are exclusively for left hand side
fitted hinge operation are supplied in a
plastic bag with the appliance:
- Door top trim hinge covers – there
are 2 different parts, one for each side
of top trim.
We suggest you keep all the parts
supplied in the plastic bag and also
parts, which have been removed when
reversing the door, in a safe place for
possible future, re-use.
IMPORTANT: We suggest you ask
somebody to help you when moving
the appliance around and to hold the
door when removing / re-fitting hinges
and the door to avoid any injury and
damage to the product.
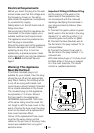
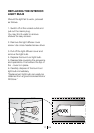
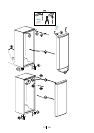
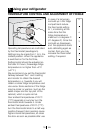
Please refer to diagrams supplied. To
follow numbers in brackets below,
refer to the main diagram.
1. Switch off the appliance
at the socket outlet and pull out the
mains plug.
2. Remove all loose items and fittings
and food inside the appliance.
3. Gently prise off plastic hinge
covers on both sides of front top panel
using a small flat-headed screwdriver.
(1-2)
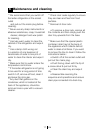
4- Unscrew the bolts of the top
hinge and remove top hinge. (3)
5- Remove door carefully off the
bottom hinge and stand door upright
in a safe place.(4)
6. Gently prise off plastic hinge
cover on door top trim. Fit the other
door top trim plastic off hinge cover
supplied in the plastic bag.(5)
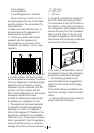
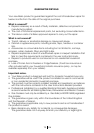
7.Gently tilt the appliance back
against a strong wall on its rear side
sufficiently to allow the lower hinge to
be removed. Take care to protect
the appliance, your wall and floor
coverings. You can utilise the original
packaging to do this. Once
you tilt the appliance back, check to
make sure the appliance is completely
stable and safe before you carry
on. (6)
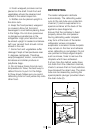
8.Unscrew and remove the front feet
and 1 bolt. (7)
9-Unscrew and remove the bottom
hinge. (8)
10-Unscrew and remove the bottom
hinge door stopper and bushing and
reposition them on the other side while
rotating the bushing 180°. (9)