


Belshaw Bros., Inc. • 1750 22
nd
Ave. S. • Seattle, WA 98144 • Phone 206-322-5474 • Fax 206-322-5425
718LCG, 724CG, and 734CG Gas Fryers MN-1141EN A-5
A common ground, usually supplied by the pilot
burner bracket, is required for the module and
the pilot burner/igniter-sensor.
1. Check for good metal-to-metal contact
between the pilot burner bracket and the
main burner.
2. Check the ground lead from the GND
(BURNER) terminal on the module to the
pilot burner. Make sure the connections are
clean and tight. If the wire is damaged or
deteriorated, replace it with #14-18 gauge,
moisture-resistant, thermoplastic-insulated
wire with a 221°F/105°C minimum rating.
3. Check the ceramic flame rod insulator for
cracks or evidence of exposure to extreme
heat, which can permit leakage to the
ground. Replace the pilot burner/igniter-
sensor and provide a shield if necessary.
If the flame rod or the bracket are bent out
of position, restore them to the correct
position.
Step 3: Check Spark Ignition
Circuit
You will need a short jumper wire made from
ignition cable or other heavily insulated wire.
1. Close the manual gas valve.
2. Disconnect the ignition cable at the SPARK
terminal on the module.
WARNING
To avoid electric shock, when performing
the following steps, do not touch the
stripped end of the jumper or the SPARK
terminal. The ignition circuit generates
over 10,000 volts.
3. Energize the module and immediately touch
one end of the jumper firmly to the GND
terminal on the module. Move the free end
of the jumper slowly toward the SPARK
terminal until a spark is established.
4. Pull the jumper slowly away from the
terminal and note the length of the gap when
sparking stops.
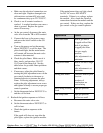
5. Check the table below.
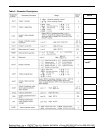
Arc Length What To Do
No arc, or arc less
than 1/8"/3 mm
Check external fuse, if
provided.
Verify power at
module input
terminal.
Replace module if
fuse and power are
okay.
Arc 1/8"/3 mm or
longer.
Nothing. (Voltage
output is okay.)
Step 4: Check Pilot and Main
Burner Lightoff
1. Set the thermostat above 200°F/93°C to call
for heat.
2. Watch the pilot burner during the ignition
sequence. Look for the following:
• The ignition spark continues after the
pilot is lit
• The pilot lights and the spark stops, but
the main burner does not light
• The pilot lights, the spark stops and the
main burner lights, but the system shuts
down (S8600H only)
3. If any of the these things happens, make sure
the flame current is adequate. Follow these
steps:
a. Turn off the fryer and disconnect it from
the power source.
b. Clean the flame rod with emery cloth.