


- 10 -
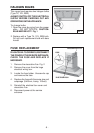
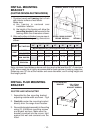
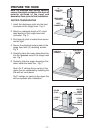
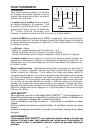
FRAMING BEHIND CROSS SUPPORT
INSTALL MOUNTING
BRACKET
(DUCTED OR NON-DUCTED HOODS)
1. Construct wood wall framing that is flush
with interior surface of wall studs.
Make sure:
a) the framing is centered over
installation location.
b) the height of the framing will allow the
mounting bracket to be secured to the
framing within the dimensions shown.
2.
After wall surface is finished, secure mount-
ing bracket to framing using dimensions
shown.
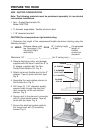
Note: minimum hood distance above cook top must not be less than 24”. A maximum
of 30” above cook top is highly recommended for best capture of cooking impurities.
Distances over 30” are at the installer and users discretion; and if ceiling height and
flue length permit.
DRYWALL
CEILING
HEIGHT
8 FEET
9 FEET
HOOD DISTANCE ABOVE 36” HIGH COOK TOP (SEE NOTE BELOW)
24” 25” 26” 27” 28” 29” 30”
MOUNTING BRACKET LOCATION ABOVE 36” HIGH COOK TOP
37-7/8” 38-7/8” 39-7/8” 40-7/8” 41-7/8” 42-7/8”
10 FEET
37-7/8” 38-7/8” 39-7/8” 40-7/8” 41-7/8”
38-7/8” 39-7/8” 40-7/8” 41-7/8” 42-7/8” 43-7/8”
37-7/8” 38-7/8” 39-7/8” 40-7/8” 41-7/8” 42-7/8” 43-7/8”
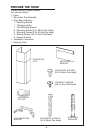
DUCTED
NON DUCTED
DUCTED OR
NON DUCTED
DUCTED WITH
FEXTK7788
DUCT METHOD
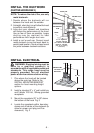
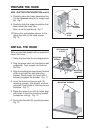
INSTALL FLUE MOUNTING
BRACKET
DUCTED AND NON-DUCTED
1. Assemble the flue mounting bracket,
adjusting outside width as shown. Fig.4
2. Carefully center the mounting bracket
directly over the range hood location.
3. Secure the bracket assembly to the ceiling
using (2) 4.8x38mm mounting screws
and drywall anchors. Make sure the
bracket is pushed into the corner, tight
against the wall and centered over the
hood.
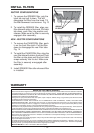
FLUE MOUNTING
BRACKET
9 3/4”
FIG. 4
3.9 x 5.7mm
FLAT HEAD
BRACKET SCREWS
WOOD CROSS SUPPORT
BEHIND DRYWALL