


Quick Tips
● Your breadmaker makes large 1.5 or extra large
2 lb loaves.
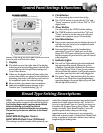
● There are five settings including one for
dough or pasta.
● The “Rapid Bake” setting can produce
variations of basic white bread in less than
2 hours. This setting can only be used with
recipes supplied (see pg. 20). You cannot use the
timer with this selection. This setting cannot
handle heavier recipes such as whole grain
because of its shortened rising cycle.
● Depending on the recipe you select, the
“Dough/Pasta” setting will let you produce
dough that can be shaped into dinner rolls,
pizza, long loaves, challah, pretzels, filled braids,
or more. For Pasta, be sure to use pasta or
semolina flour. Pasta dough should be
processed through a pasta maker or pasta
shaper to form the desired shape. Consult the
Cookbook section of this manual.
● The Crust Control function lets you choose
“Regular” or “Dark” crust on the Basic, Rapid
Bake, or Sweet settings. It cannot be used on the
Whole Grain or Dough/Pasta settings.
● The “Keep Warm” function begins automatically
after bread is baked. It keeps baked bread
warm up to an hour after the baking is done.
This function stops after 60 minutes or when
the unit is unplugged, or the Start/Reset button
is pressed.
● An “Add-Ingredient” function signals with
beeps when it’s time to add ingredients
such as fruits or nuts to recipes used with any
setting except Rapid Bake. A beep signals before
kneading is completed to let you know when to
add ingredients. This feature helps keep fruit or
nuts whole (See “Add-Ingredient Function”
pg. 10 for more details). If you use the TIMER to
delay baking, you may add all ingredients at
once and bypass this function, however, your
fruit or nuts may get “chopped” and blended
into the bread.
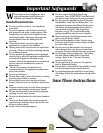
● Do not cover the breadmaker with towels
or other material that may prevent steam from
escaping. Some steaming from vents is normal.
Because of escaping steam, you should keep the
breadmaker several inches away from cabinets
while making bread.
● Do not place any objects on top of the
breadmaker.
●
IMPORTANT: Add ingredients in the order they
are specified in the recipe. For best results,
accurate measuring of ingredients is very
important. Do not put larger quantities than
recommended into the Baking Pan as it may
produce poor results and may damage the
breadmaker.
5
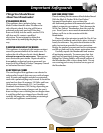
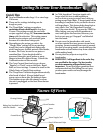
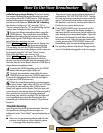
Getting To Know Your Breadmaker
Names Of Parts
C
L
O
C
K
T
IM
E
R
S
T
A
R
T
R
E
S
E
T
C
R
U
S
T
C
O
L
O
R
B
R
E
A
D
T
Y
P
E
A
ll-In
-O
n
e
™
D
e
lu
x
e
A
u
to
m
a
t
ic B
re
a
d
m
a
k
er
Lid
Vents
Power Supply Cord
Easy-Lift Recessed Grips
Viewing Window
Baking Pan (Installed in Case)
with Wire Handle
Oven Chamber
Control Panel
Wire Handle
Baking
Pan
Mixing Paddle
Rotating
Shaft
Table Of Contents