


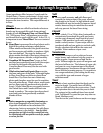
the Baking Pan, slide a flat rubber or plastic spatula
along the sides of the pan to loosen the loaf. Turn
the pan over and shake the loaf out. Allow the bread
to cool before slicing. If the
Mixing Paddle remains in the
bottom of your loaf, allow the loaf to cool then use a
plastic spoon or rubber spatula to remove the pad-
dle. Do not use a knife or other sharp metal object
as this will scratch the non-stick coating on the
Mixing Paddle.
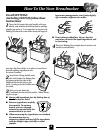
Using The “Add-Ingredient”
Function
1
All settings, except for RAPID bake, have a built-
in “Add-Ingredient” function which signals with
beeps when it’s time to add ingredients such as
fruits or nuts. The beeps sound before kneading is
complete to let you know it’s time to add the
ingredients. The actual time of the beeps can vary
up to 5 minutes depending on the room tempera-
ture at the time when you started the bread making
program. The following chart can be used for refer-
ence:
2
This function lets you add ingredients so that
they don’t get chopped up by the Mixing Paddle
and blended into your loaf. If you are using the
TIMER to delay baking (perhaps while you are asleep
or away from home), you may bypass this function
by ignoring the signal and adding ingredients in the
order called for in the recipe, however, you may end
up with somewhat broken pieces.
3
To add ingredients, raise the lid and carefully
pour the ingredients into the Baking Pan.
CAUTION: It is important to avoid spilling
ingredients into the oven chamber.
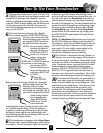
Setting The Timer
(For Delayed Completion)
Use the TIMER when you would like to delay the
completion of your bread or dough. This feature
allows you to delay bake time for up to 13 hours.
For example, it lets you set the TIMER at 7 p.m. one
evening so that you can wake to fresh bread by 8
a.m. the following morning.
NOTE: The TIMER
cannot be used with the Super Rapid Bake setting.
To set the TIMER, follow these instructions:
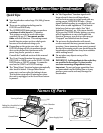
NOTE: Be sure you have followed the “How to Use
Your Breadmaker”
steps 1-6 in preparing the
ingredients in the Baking Pan and selected a MENU.
It is not recommended that you use the “Delayed
Completion”function and TIMER with recipes that
call for fresh ingredients that might spoil such as eggs,
fresh milk, buttermilk, or cheese.
1
To use the TIMER, you must first set the digital
clock to the correct time of day. To change the
flashing 12:00
a.m.,
first press the CLOCK button.
While the “Hour” is flashing, immediately press the
“Up” and “Down” arrows to change the time in 1 hour
intervals. Make sure the “a.m.” or “p.m.” displayed is
appropriate.
While the correct hour is flashing in the
display, press the CLOCK button again to set the min-
utes. If the hour display has stopped flashing before
the minutes have been set, press the CLOCK button
twice.
While the “00”is flashing, the minutes can be
set by pressing the “Up” and “Down” arrows. You may
hold either arrow to rapidly change the time in
5-minute intervals, or press and release to change
1 minute at a time.
2
Once the clock is set, the TIMER can easily be set
following similar steps. To wake up to the aroma
of fresh baked bread at 8:30 a.m. for example, press
and hold the TIMER button until appears
on the display, and the hour flashes as it did when
setting the clock above.
While the “hour”is flashing,
press the “Up” or “Down” arrows to reach “8”, check-
ing to make sure “a.m.” is displayed. To set the min-
utes, press the TIMER button
while the hour setting
is flashing.
If the hour setting has stopped flashing
How To Use Your Breadmaker
When to add Time Displayed
Setting Ingredients after when Beeper
Signals Starting Program Signals
Basic Bread 30-35 minutes into program 3:15-3:20
Sweet Bread 30-35 minutes into program 3:15-3:20
Grain 37-42 minutes into program 3:28-3:33
Dough 40-45 minutes into program 1:15-1:20
10
TIMER