


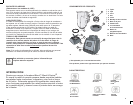
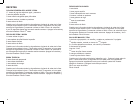
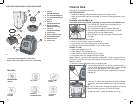


† 1. Lid cap
(Part#BLP5600-02)
† 2. Lid (Part# BLP5600-01)
† 3. Jar (Part# BLP5600-03)
4. Handle
† 5. Gasket
(Part# BLP5600-04)
† 6. Blade assembly
(Part# BLP5600-05)
† 7. Jar base
(Part# BLP5600-06)
8. LCD display
9. Power indicator light
10. OFF/PULSE button
11. Speed buttons
12. Power base
GETTING FAMILIAR WITH YOUR APPLIANCE
† Consumer replaceable/removable parts
Product may vary slightly from what is illustrated.
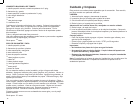
MOTION SPEED
DISPLAY
ICE CRUSH
INTELLIGENT
FUSE
™
4 PLANE
BLADES
DIE CAST
ALUMINUM BASE
POWERFUL
MOTOR
FEATURES
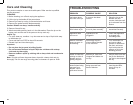
How to Use
This unit is for household use only.
GETTING STARTED
• Removeallpackingmaterialandanystickersfromtheproduct.
• WashallremovablepartsasinstructedinCareandCleaningsectionofthis
manual.
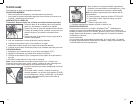
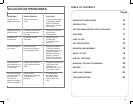
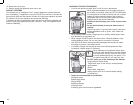
BLENDER JAR ASSEMBLY (B)
CAUTION: Never place blade assembly on base unless assembled to jar.
1. Turn blender jar upside down and place flat on
counter top or work surface.
2. Put the gasket on top of the blade assembly.
3. Place the blade assembly with gasket in bottom
opening of the jar with blades down.
4. Place jar base onto jar and rotate clockwise until
it is tight.
5. Turn assembled jar right side up.
6. Place lid with lid cap in place on blender jar.
7. Uncoil power cord from storage area under the base.
8. Place jar on power base. Blender is now ready for use.
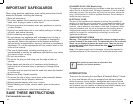
READY TO USE
1. Make sure appliance is OFF.
2. Place foods to be blended into jar.
3. Place lid on jar; make sure lid cap is in place.
4. Plug power cord into standard electrical outlet.
Note: When in use do not leave blender unattended. When using hard foods,
such as ice, cheese, nuts and coffee beans, keep one hand on the lid to keep
blender in place.
5. Select the speed that best suits your desired task.
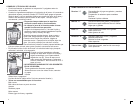
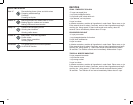
6. For blending tasks such as grinding coffee beans or
nuts, or when blending thick mixtures, use the PULSE
button for several seconds; then release (C).
Releasing the PULSE button automatically turns the
blender off.
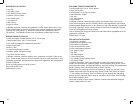
7. Open the lid cap to add ingredients while the blender
is running, and drop ingredients through the opening
(D).
Note: Do not remove the lid while the blender is running.
8. When finished, press the OFF/PULSE button.
9. To remove the jar, grasp the handle and lift up.
1
1 1/4
LT
1/4
1/2
3/4
B
1
1 1/4
LT
1/4
1/2
3/4
D
POWER
OFF/
PULSE
1
STIR
2
BLEND
3
CHOP
4
PUREE
5
ICE
CRUSH
OFF/
PULSE
1
1 1/4
LT
1/4
1/2
3/4
C
POWER
OFF/
PULSE
1
STIR
2
BLEND
3
CHOP
4
PUREE
5
ICE
CRUSH
1 1/4
1
3/4
1/2
1/4
LT
2
4
3
5
6
7
8
9
10
11
12
1
A
18
17