


6
7
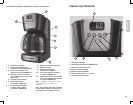
How to Use
This product is for household use only.
GETTING STARTED
•Removeallpackingmaterialandanystickersfromtheproduct.
•Removeandsavetheseinstructions.
•Pleasegotowww.prodprotect.com/applicatoregisteryourwarranty.
•WashallremovablepartsasinstructedinCAREANDCLEANINGsectionofthismanual.
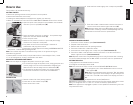
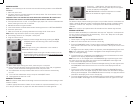
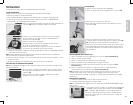
• Openone-piececoverandpourfreshcoldwaterintothewater
reservoir up to 12-cup (MAX) mark (B).
• Placepermanentnylonfilterorpaper8–12cupbasket-style
paper filter into filter basket holder (C).
• Closeone-piececover.
• Makesurethelidofthecarafeisinplaceandplaceempty
carafe on the “Keep Hot” carafe plate.
• Pullpowercordoutofthecordstorageinthebackof
coffeemaker and plug into an outlet.
• BrewwaterthroughappliancefollowingtheBREWINGCOFFEE
instructions–withoutaddingcoffeegrounds.
Note: This removes any dust or residue that may remain in the system during the
manufacturing process.
•Discardwaterfromthecarafe;rinsepermanentfilterordiscardpaperfilter,ifused.
•Turnofftheappliance,unplugitandallowtocooldown.
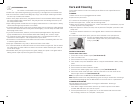
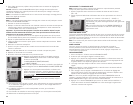
ADJUSTING THE POWER CORD LENGTH
Note: You can adjust the length of the power cord to suit your needs.
• Toincreasethelengthofthepowercord,simplygraspthecord
(not the plug) in the rear of the coffeemaker and gently pull
down and out of the slot away from the coffeemaker (D).
• Todecreasethelengthofthepowercord,simplyfeedany
excess cord into the slot in the rear of the coffeemaker.
WATER FILTER
1. Remove carbon filter from packing material.
2. Press latch on filter holder to open (E).
3. Place carbon filter inside.
ENGLISH
D
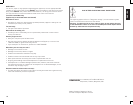
4. Close the filter holder tightly until it snaps into place (F).
5. Place filter holder inside the water reservoir and insert it
into the recess at the bottom right hand corner (G).
Note: Replace carbon filter every 60 brewing cycles or every
2 months after removing it from the sealed package. Call the
800 number on the front cover for replacements
WATER FILTER REPLACEMENT
1. Press latch on filter holder to open (see illustration E).
2. Dispose of old carbon filter.
3. Remove new carbon filter from packing material.
4. Place new carbon filter inside filter holder.
5. Close the filter holder tightly until it snaps into place (see illustration F).
6. Place filter holder inside the water reservoir and insert it into the recess at the
bottom right hand corner (see illustration G).
Note: Replace carbon filter every 60 brewing cycles or every 2 months after removing
it from the sealed package. Call the 800 number on the front cover for replacements.
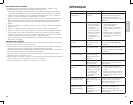
SETTING THE CLOCK
1. Plug appliance into standard electrical outlet.
2. The digital clock display flashes 12:00.
Note:YoumustsettheclockinordertousetheDELAYEDBREWINGfeature.
3. To change the time: Press HOUR button until the correct
time appears (H).
Note: When the time passes noon the letters “PM” will appear
in the lower right corner of the display to let you know you are
in P.M. time. If the PM is not shown in the display, the time is
AM.
4. Repeat with the minute (MIN) button.
Tip: Hold the buttons down to make the hours and minutes change rapidly after a short
delay. To change the time in 1-hour or 1-minute increments, tap the button.
Note: If the appliance is unplugged or power is interrupted even momentarily, the time
may need to be reset.
B
C
H
E
F
G