


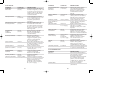

6. Firmly press the HIGH or LOW speed button, then press down lightly but
firmly on food pusher.
Note: Let processor do the work. Heavy pressure will not speed up operation.
7. After processing food, press the control to OFF. Allow disc to stop rotating.
Twist food chute/cover clockwise to UNLOCK and remove.
8. Carefully pull slice/shred disc off the stem, remove stem, unlock container by
turning it clockwise, and lift it off.
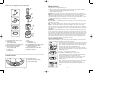
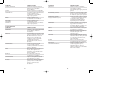
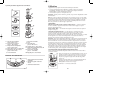
CHOPPING BLADE (E)
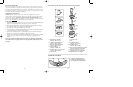
1. Place container over center post in base with handle at the
left. Turn container toward base until it drops down into
place. Turn container counterclockwise until it locks into
place (Handle aligns with HIGH speed button) (A).
2. Grasp chopping blade by its center shaft and slide it down
onto center post (F).
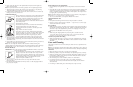
3. Place food into container.
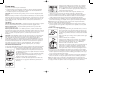
4. Place food chute/cover onto container with food tube to
the left of the handle. Twist food chute/cover
counterclockwise until you hear it click into place and
LOCK (D).
5. Plug cord into an electrical outlet.
6. Press HIGH, LOW or PULSE. When pulsing, hold pulse
position for about 2-3 seconds at a time. Check results and
repeat for desired consistency. It is better to use several
short operations rather than a single long one, unless
mixing ingredients that require longer processing times.
7. After processing food, press control to OFF or release PULSE button. Allow
chopping blade to stop rotating. Twist food chute/cover clockwise to UNLOCK
and remove cover.
8. Grasp blade by its shaft and remove. Unlock container by turning it clockwise,
and lift it off. Empty the processed food.
Note: You can empty the contents of the container without removing the
chopping blade. From the bottom place one finger through the center opening to
hold the blade in place. Invert container or use a spatula to remove food.
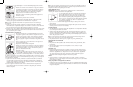
DOUGH BLADE (G)
IMPORTANT: Follow the instructions under "CHOPPING BLADE" to install and
remove the dough blade.
1. The dough blade can be used to make yeast breads, pizza
dough, or yeast rolls that are made with 3 cups (750 ml)
of flour or more. Use the 2 dough recipes in this manual as
a guide when making bread or pizza dough. Be sure to add
liquid ingredients slowly as the dough will not form
properly if liquid is added too fast.
2. You may have to stop the unit at times to scrape down the sides of the
processing bowl.
3. Do NOT use the dough blade to make pie crust. Use the chopping blade for
pie pastry (see recipes).
Bread Making Tips for the Dough Blade
1. For best results, use ingredients at room temperature and be sure the butter
is soft.
2. Check the date on the yeast package to be sure it hasn’t expired. Measure flour
accurately by spooning it into a measuring cup designed for dry ingredients.
Level it off with the straight side of a knife or metal spatula. Do not pack flour
by tapping the cup when measuring.
Note: Maximum amount of flour to be used is 6 cups (1500 ml) of all-purpose or
bread flour or 3 1/2 cups (875 ml) of whole grain flour.
3. You may use bread flour, if you’d prefer. Breads will be taller.
FOOD PROCESSING TIPS
Liquids
• Hot liquids (not boiling) and hot foods can be processed in container.
• Be sure to process small amounts of liquids — 2 cups or less at a time. Larger
amounts will leak from container.
Dry Ingredients
• When preparing cookie, cake batter or quick bread, use the chopping blade to
cream butter or shortening and sugar first. Add dry ingredients last. Place nuts
and fruits on top of dry ingredients to prevent over chopping. Process using
short pulses until blended. Do not over process.
Meat
• When using the chopping blade for processing meat, cut the meat into
1" (2.54cm) cubes. Do not put more than 1/2 lb. (227g) of meat into the
container at a time. Chop on pulse to the size desired.
Food Size, Preparation and Loading
•When using different foods in a recipe, process dry ingredients first and moist
ingredients later. This reduces the number of times container must be washed
and dried.
Care and Cleaning
This product contains no user serviceable parts. Refer service to qualified service
personnel.
Note: Do not attempt to sharpen the cutting edges of the blades or discs. They are
permanently sharpened at the factory and will be ruined by attempted sharpening.
CLEANING
1. Before cleaning, be sure unit is off and cord is unplugged.
2. Whenever possible, rinse parts immediately after processing for easy cleanup.
3. Wipe base and feet with a damp cloth and dry thoroughly. Stubborn spots can
be removed by rubbing with a damp cloth and a mild, non-abrasive cleaner.
Do not immerse base in liquid.
4. All removable parts can be washed by hand or in a dishwasher.
• If washing by hand, wash in sudsy water, rinse, and dry thoroughly.
If necessary, use a small nylon bristle brush to thoroughly clean container
and food chute.
• If washing in a dishwasher, place removable parts on top rack only.
6
5
F
E
G
FP1610SPub600021 3/31/05 2:14 PM Page 6