


English
-6-
After use
Switch off and remove the plug from the
power outlet when not in use, before
assembling or disassembling parts,
cleaning or carrying out any maintenance
of the appliance. Never pull the cord while
removing it from the power outlet.
Keep children and animals away from the
unit and cord set.
Inspection and repairs
If the supply cord is damaged, it must be
replaced by the manufacturer, its service
agent or similarly qualified persons in order
to avoid a hazard.
Electrical safety
This product must be earthed.
Always check that the power supply
corresponds to the voltage on the
rating plate
Power plugs must match the outlet. Never
modify the plug in any way. Do not use any
adaptor plugs with earthed (Class l)
appliances. Unmodified plugs and
matching outlets will reduce the risk of
electric shock.
Never operate an appliance directly below
the socket-outlet it is connected to.
Do not insert any object into the openings
on the outer case.
Extension cables & Class l product
• A 3-core cable must be used as your
appliance is earthed and of Class l
construction.
• Up to 30m (100 ft) can be used without
loss of power.
• If the supply cord is damaged, it must
be replaced by the manufacturer or an
authorised Black & Decker Service
Centre in order to avoid a hazard.
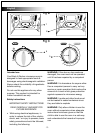
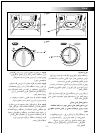
Features (Fig. A)
1 Door safety lock
2 Door
3 Window
4 Control panel
5 Timer control / Weight Defrost
6 Power control
7 Roller support
8 Glass tray
9 Stem
10 Door release
Unpacking
• Remove all packaging from the
appliance.
• Inspect the oven after unpacking for any
damage such as a misaligned or
damaged door, dents or holes in the
door window and screen, and any dents
in the cavity. If any of these are seen, DO
NOT use the oven.
• Clean the appliance before first use.
Assembly (Fig. B)
Warning! Before assembly, make sure that
the appliance is switched off and
unplugged.
• Place the appliance on a flat, even
surface.
• Open the door (2) & place the stem (9)
into the hole in the cavity base. The door
is opened by pressing the door release
(10).
• Place the roller support (7) into the hole
in the cavity.
• Align the glass tray (8) on top of the
roller support.
• Connect the appliance to a suitable
electrical supply.