


12
11
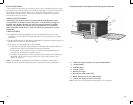
12. Now, use your ruler or the paper ruler provided to measure the overhang
molding height, placing your ruler vertically against the underside of the
cabinet behind the overhang molding. This number determines the number of
spacers you need, using a number of spacers equal to the overhang molding
height. For example, a 1” overhang molding would use 2, ½” spacers on each
of the rear holes (M).
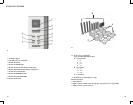
13. Drop one of your screws through each of the washers covering the holes in the
cabinet, from inside the cabinet down.
Note: To determine which screws to use, you must have enough of the screw
exposed underneath the cabinet to properly thread the screw into the nut.
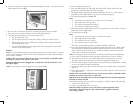
14. Place the appropriate number of spacers determined in step 12 on both of the
rear screws so the appliance will be even (N).
Note: If the height of your overhang molding is too tall to be accommodated by
the number of spacers provided, you may call, toll-free, at 1-800-231-9786 to
order additional spacers at no charge.
Note: For spacer installation, you may require assistance in order to hold spacers
in place while securing the appliance at the same time. If assistance is not
available, use a small clamp to hold the spacers in place while you position the
appliance.
15. Once spacers are set, hold hood up and tighten screws to secure. Screw from
inside the cabinet down.
Note: Always tighten screws to ensure the appliance does not move or shake
during operation.
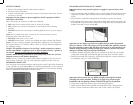
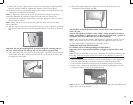
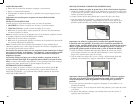
4. After measuring the overhang molding thickness as shown in Illustration J, look
at the dashed lines on the mounting template; each line has a measurement
next to it that indicates the thickness of the overhang molding used with that
line. For example, if your cabinet has an overhang molding thickness of ½”,
you will use the ½” dashed line on the template.
5. Fold the template along the dashed line that matches the thickness of your
overhang molding.
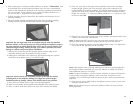
6. Place the folded template against the back edge of the overhang molding,
making sure the side with the drill hole marks is facing down (K).
Important: Do not align screw holes on template directly under the partition
between cabinets, as this will prevent you from installing the appliance properly.
Pay close attention to where the drill holes will be set so as not to damage your
cabinets during mounting. Drilling through your cabinet’s partition may cause
damage to cabinets and prevent proper installation.
7. Making sure to keep the fold line straight against the back edge of the
overhang molding, tape the template securely in place.
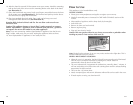
8. Drilling from underside of the cabinet up, drill holes through the 4 places
marked on the template using a ¼-inch drill bit (L).
Important: Always ensure you are drilling straight up through the marked
mounting hole on the template. Drilling at an angle may prevent proper
installation and may damage cabinets if the drill bit pierces the partition.
9. Once holes are drilled, remove tape and mounting template.
10. Wipe dust and debris off the topside and underside of the cabinet surface.
11. Place a washer inside the cabinet over each of the 4 holes you drilled.
L
M
K
N