


SECTIONAL FRYER FILTER SYSTEM CLEANING & MAINTENANCE
OWNER’S MANUAL 1184960 PAGE 11 OF 20
3. If necessary, allow the filter pan to cool.
4. Remove the drain-pipe nipple from the end of the drain-pipe outlet. (The drain-pipe nipple minimizes the
splashing of hot oil when a frypot is drained into the filter pan.)
5. Disconnect the drain pan’s stainless steel hose from the quick-disconnect fitting by pushing upward on the
wooden ring of the quick-disconnect and exerting downward pressure on the connector at the end of the hose.
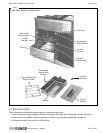
6. Pull the filter pan forward and out of the filter system cabinet.
7. Release the four latches that secure the filter-paper hold-down frame. Remove the hold-down frame from the
filter pan and place it in a sink for cleaning
8. Remove and discard both sheets of filter paper.
9. Remove the wire rack beneath the filter paper and placed it in a sink for cleaning.
10. Drain any remaining oil from the bottom of the filter pan into a proper waste receptacle. You must lift and tilt the
filter pan to accomplish this. The filter pan is somewhat heavy, so you may need assistance.
11. Clean the interior of the filter pan with one of the recommended cleaners. Clean beneath the oil pick-up tube
located in the bottom rear of the filter pan with a knife blade or other similar thin, flat instrument. Rinse the pan
interior and mop out excess water with a dry cloth or paper toweling.
12. Clean, rinse, and dry the wire rack and filter-paper hold-down frame that you placed in the sink earlier.
13. Place the wire rack in the bottom of the drain pan.
14. Place two layers of new filter paper on top of the wire frame.
15. Place the filter-paper hold-down rack on top of the filter paper and secure it with the four latches.
16. Place the filter pan in the filter cabinet and secure its hose connection with the quick disconnect fitting (push
upward on the wooden ring while inserting the end of the hose).
17. Re-attach the drain-pipe nipple.
CLEANING STAINLESS-STEEL SURFACES
To remove normal dirt, grease and product residue from stainless steel surfaces that operate at LOW temperature,
use ordinary soap and water (with or without detergent) applied with a sponge or cloth. Dry thoroughly with a clean
cloth.
To remove BAKED-ON grease and food splatter, or condensed vapors; apply cleanser to a damp cloth or sponge and
rub cleanser on the metal in the direction of the polishing lines on the metal. Rubbing cleanser, as gently as possible,
in the direction of the polished lines will not mar the finish of the stainless steel. NEVER RUB WITH A CIRCULAR
MOTION. Soil and burnt deposits which do not respond to the above procedure can usually be removed by rubbing
the surface with SCOTCH-BRITE scouring pads or STAINLESS scouring pads. DO NOT USE ORDINARY STEEL
WOOL as any particles left on the surface will rust and further spoil the appearance of the finish. NEVER USE A
WIRE BRUSH, STEEL SCOURING PADS (EXCEPT STAINLESS), SCRAPER, FILE OR OTHER STEEL TOOLS.
Surfaces which are marred collect dirt more rapidly and become more difficult to clean. Marring also increases the
possibility of corrosive attack. Refinishing may then be required.
“Heat tint” is darkened areas that sometimes appear on stainless steel surfaces where the area has been subjected to
excessive heat. These darkened areas are caused by thickening of the protective surface of the stainless steel and
are not harmful. Heat tint can normally be removed by the foregoing, but tint which does not respond to this procedure
calls for a vigorous scouring in the direction of the polish lines using SCOTCH-BRITE scouring pads or a STAINLESS
scouring pad in combination with a powered cleanser. Heat tint may be lessened by reducing heat to equipment
during slack periods.
BLACK BAKED-ENAMEL SURFACES
Allow appliance to cool somewhat after use and wash black baked-enamel surfaces with a hot, mild detergent or soap
solution. In particular, clean off all grease deposits. Dry thoroughly with a dry cloth.