


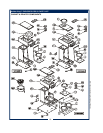
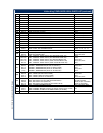

SERVICING INSTRUCTIONS (continued)
14
M611 75804 Owners Manual Koffee-King™ Brewers
REPLACE HEATING ELEMENT
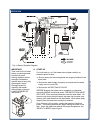
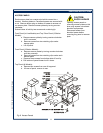
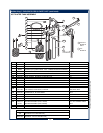
Remove tank lid assembly as described on page 13.
Remove two hex nuts holding element to cover. Pull element
from mounting holes.
Reassemble in reverse order.
REPLACE SOLENOID
Symptom: Automatic brewer will not flow water; or,
automatic brewer drips continuously from brew head.
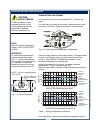
NOTE: Wrench p/n 86660 is designed to allow easy removal of
the hoses from the plastic solenoid valve.
IMPORTANT: Shut-off water and electric supply to brewer
before removing hoses or wiring.
Remove water supply flare fitting:
a. Slide the 5/8" end of the wrench over the flats on the
inlet fitting of the valve.
b. Hold the wrench to prevent the inlet fitting from turning
while installing or removing the inlet water supply flare
nut.
Remove braided hose:
a. Slide the 7/16" end of the wrench between the valve
body and the white ring on the extreme end of the metal
hose fitting.
b. Pressure on the white ring toward the metal ferrule
releases the clinch ring, allowing the hose to be easily
slid off of the solenoid bypass outlet.
c. Install hose on new valve by pressing end of hose onto
bypass outlet until it is fully seated.
Disconnect wiring.
Remove two screws holding solenoid to access door.
Reassemble in reverse order.
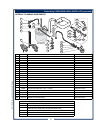
CLEAN SOLENOID SCREEN
Symptom: Automatic brewer will not flow water.
Unplug power cord or turn circuit breaker OFF. Turn OFF and
disconnect water supply from brewer inlet fitting.
Unscrew water inlet fitting from solenoid.
Using needle-nose pliers, withdraw strainer screen from solenoid.
Clean screen under faucet. A stiff bristle brush may be used if
necessary.
Reinsert screen in solenoid. Be careful to maintain correct
orientation. (The OPEN END of the screen goes in FIRST.)
Reassemble in reverse order.
Fig. 12 Clean Strainer Screen
Fig. 11 Remove Faucet
Supply from Solenoid
IMPORTANT: When replacing
heating element, also replace
seal gaskets.