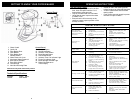
COFFEE MAKER FEATURES
OPERATING INSTRUCTIONS
Using the Coffee Maker To Make
Tea
Make sure that the filter basket, lid and
carafe has been completely cleaned in
warm soapy water, especially if it was used
to make coffee previously.
1. Depress the filter basket door release
button to swing open the filter door.
2. Place tea bag(s) into the filter basket.
NOTE
: If loose tea is used, place a paper
filter in the filter basket before measuring
the loose tea required.
3. Fill the illuminated water reservoir with
the right amount of water depending on
serving needs.
4. Depress the auto/power button to
desired mode, advance timer or power
on.
5. An alternate suggestion is to place the
tea, loose or bags directly into the
carafe, allowing water to flow into the
carafe to steep the tea.
To Remove Calcium Build-up from
Coffee Maker
Calcium deposits may build up in the
coffee maker as a result of minerals
commonly found in drinking water. The
build-up is normal and may result in a
slow down on the coffee maker’s brewing
time, or the taste of the coffee. This can
be eliminated by periodically decalcifying
the coffee maker.
1. Fill the carafe with cold water and two
tablespoons of plain, white household
vinegar.
2. Pour the solution into the water
reservoir, then close the reservoir
cover.
3. Place the carafe on the warming plate
and allow the coffee maker to brew the
vinegar solution.
4. Do not use a filter when decalcifying.
5. When the vinegar solution has finished
brewing, empty the carafe and rinse
out with cold water.
6. Refill the illuminated water reservoir
with cold water only and run another
brew cycle to remove any remaining
vinegar solution.
To Remove Calcium Build-up from
Carafe
Hard water or repeated use can leave a
white stain on the carafe, which will turn
brown from the coffee or tea. To clean the
carafe:
1. Fill the carafe with a solution of equal
parts of tap water and vinegar and let
the carafe stand with the solution for
20-30 minutes.
2. Use a soft brush to brush the inside of
the carafe to further loosen the build-
up.
3. Discard the solution and wash the
carafe with warm soapy water then
rinse well.
NOTE
: Frequency of cleaning required
depends on frequency of use and
cleaning between brews.
SUGGESTED CLEANING INTERVALS
:
Type of Water Cleaning Frequency
Soft Water: After 80 brews
Hard Water: After 40 brews
General Features
1. Two (2) Hour Automatic Shut-Off
For safety, this coffee maker has
been designed with an auto shut-off
feature. The coffee maker shuts off
automatically 2 hours after the
brewing cycle has completed, for
both the regular and advance timer
mode. To restart simply press the
power button until the “On” light
illuminates.
2. Brew Pause
This feature allows you to interrupt
the brewing cycle and pour a cup of
coffee before the pot of coffee has
completed brewing. To restart the
brewing process, return carafe to
warming plate and coffee will
automatically begin flowing through
the filter basket. Make sure the
carafe is placed correctly on the
warming plate.
NOTE
:Do notremove the carafe for
longer than 30 seconds or the filter
basket may overflow.
3. Digital Clock/Advance Timer
Display
The 24-hour digital clock found on
the front of the unit will keep the
correct time, even after the unit has
been shut off. The timer can be
programmed up to 24 hours in
advance to automatically start
brewing fresh, hot coffee.
4. Illuminated Water Reservoir
The large easy-to-read numbers
indicate how many cups of water
have been poured into the coffee
maker.
5. Illuminated Water Reservoir and
Power “On” Light
There are two ways to easily see
if the coffee maker is on, the
power “On” indicator light and the
illuminated water reservoir. When
the unit is on, both will light up.
6. Flavor Seal
The carafe lip and lid seal to help
preserve the coffee’s natural flavor
and temperature by preventing
excessive evaporation.
7. Easy Pour Carafe
The unique design of the carafe
with the all-around lip and
traditional pour spout allow you
to conveniently pour without
spilling. The easy grip handle is
for added comfort. Cup markings
on each side of the handle make
it easier to measure the water
level when filling the carafe.
9. Non-Stick Warming Plate
Spilled coffee will not stick to the
surface of the warming plate,
just wipe with a damp cloth to
clean.
10. Cord Storage
Hidden cord storage allows you
to hide excess cord for a cleaner
counter top.
11. Swing Away Basket and Filter
Basket Release Button
The filter door swings for
convenient filling. The filter
basket release button allows you
to open the filter basket with one
quick motion.
12. Cone Filter Basket
Cone shaped filter basket
enriches flavor and prevents
bitter taste. A standard #4 cone-
shaped filter must be used.
13. Brew Strength Button
The brew strength button
enhances the flavor of the coffee
when a richer tasting coffee
brew is preferred.
Cleaning the Coffee Maker
CAUTION: Always make sure the
coffee maker is unplugged and warming
plate is cool before attempting to clean.
WARNING
: To protect against electric
shock, do not immerse cord, plug or
unit into water or other liquids.
1. The outside of the coffee maker can be
cleaned with wiping the outside surface
with a damp, soft cloth.
2. The glass carafe, carafe lid and
removable filter basket may be washed
with warm, soapy water or placed in the
top rack of the dishwasher. Do not
place any other parts of the coffee
maker in the dishwasher.
3. To clean the permanent filter, empty the
grounds and rinse thoroughly.
4. Do not clean the inside of the water
reservoir with a cloth as the cloth may
have a lint residue that could block the
coffee maker.
5. For stubborn stains, use a nylon or
plastic pad with a non-abrasive cleaner,
Do not use metal scouring pads or
abrasive cleansers.
6 3


