


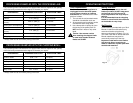

The processing times indicated below are approximate and also depend on the quantity
of the food to be processed and the degree of fineness you require.
PROCESSING EXAMPLES WITH THE PROCESSING JAR:
INGREDIENTS MAXIMUM QUANTITIES OPERATION TIMES
Parsley 2.5 oz. (70 gr.) 10-15 seconds
Carrots 14 oz. (400 gr.) 10-15 seconds
Tomato (cut in small
pieces)
22.9 oz. (650 gr.) 10 seconds
Fruits (Cut in small pieces) 17.5 oz. (500 gr.) 10 -15 seconds
Nuts 10.5 oz. 300 gr.) 5-10 seconds
Onions (cut in small
pieces)
7 oz. (200 gr.) 5-10 seconds
Baby foods* 10.5 oz. (500 gr.) 10 seconds
Chopping Ice 6 oz. (170 gr.) 15 seconds
* Always allow food to cool before placing in the bowl.
The processing times indicated below are approximate and also depend on the quantity
of the food to be processed and the degree of fineness you require.
INGREDIENTS MAXIMUM QUANTITIES OPERATION TIMES
Onions / Garlic 5.25 - 7 oz. 5-10 pulse
Soup 7 - 10.5 oz. 10 seconds continuous
Parsley 1.4 - 1.75 oz. 10 pulse
Nuts 3.5 - 7 oz. 5-10 pulse
Fruits 8.8 - 10.5 oz. 5-10 pulse
Baby foods* 8.8 - 10.5 oz. 5-10 pulse
PROCESSING EXAMPLES WITH THE CHOPPING BOWL:
* Always allow food to cool before placing in the bowl.
7
OPERATING INSTRUCTIONS
Care & Maintenance
Caution: Ensure that the appliance is
unplugged from the electrical power
source before changing or cleaning
attachments. Do not immerse the mixer
gear box in water.
1. The unit and the various attachments
should be cleaned after each use.
2. All accessories and containers can be
cleaned with warm soapy water.
3. Use a damp cloth or sponge to clean
the housing of the power pack. Do
NOT immerse in water or any other
liquid.
Caution: Use extreme caution
when cleaning the chopper blade
or metal stick blender because
blades are SHARP.
Storing Your Unit
You may store your unit in the wall
bracket provided. Do NOT wrap power
cord around unit. Coil the cord in
loose loops and tie with a tye wrap or
twist tie.
It is recommended that the chopping
blades be stored inside the containers
as the blades are very sharp.
8
Wall Bracket
A wall bracket is provided with your Stick
Blender. Install the wall bracket in any
convenient location using the wall
anchors and screws (included). (Fig. 14)
The Power Pack with or without the Stick
Blender attachment may then be
conveniently stored out of the way.
Important: Install wall mount bracket
high enough above countertop to
allow for clearance of power pack with
stick blender attached.
Fig. 14