ATTACHING THE BEATERS/
DOUGH HOOKS
1. Place the Wizz Mix Plus stand on a level,
dry surface, such as a bench top. Ensure
the mixer stand arm is in the horizontal
position.
2. Attach the beaters to the mixer before it
is placed onto the mixer stand.
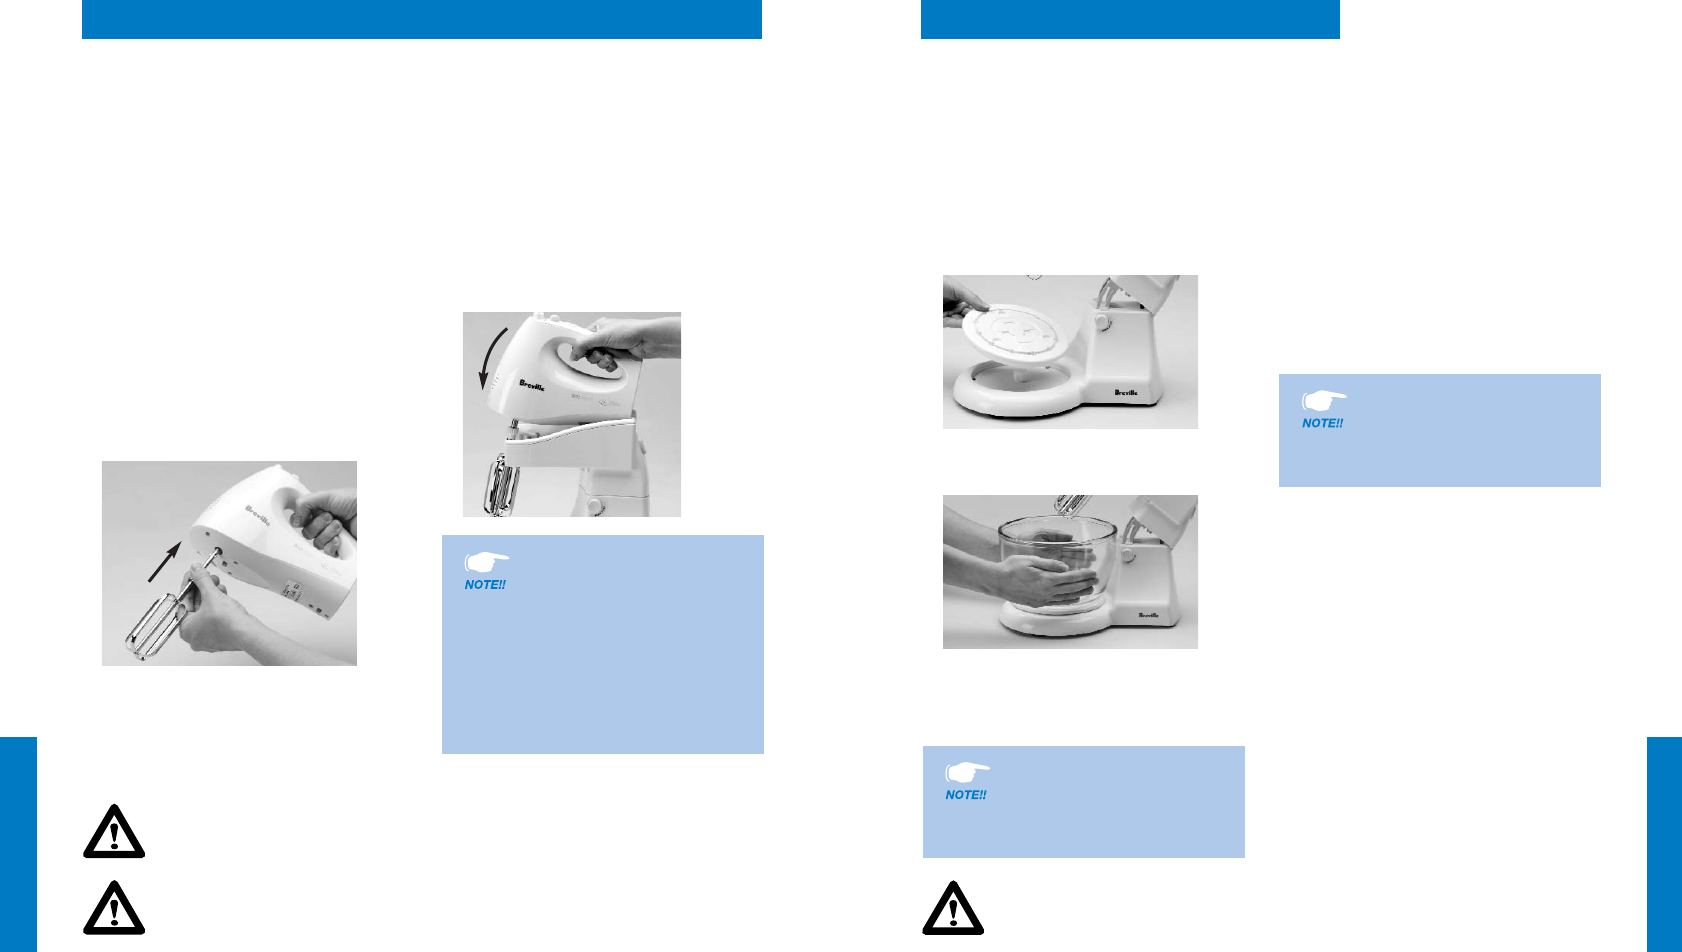
3. Insert each beater shaft into the left and
right beater sockets underneath the
mixer body (see Figure 1). Ensure the
beater with the white cog wheel collar is
inserted into the socket with the cog
wheel pattern. This is important to drive
the bowl.
4. Insert the beaters by pushing the shaft
into the socket, turning slightly if required
until they lock into place.
ATTACHING MIXER MOTOR
TO MIXER STAND
1. To attach the mixer body to the mixer
stand, position the mixer motor on the
stand so that the back of the mixer aligns
with the back of the arm stand.
2. Press the mixer unit down on the stand
until the latch clicks into the locking
position. (see Figure 2).
6
4. Ensure that the speed selector switch is
set to the 'OFF' (O) position. Also ensure
that the mixer is securely attached to the
stand before using.
5. Add ingredients to the mixing bowl as per
the recipe or your requirements.
6. Position the mixing bowl platform
supplied on the mixer stand (See figure 3).
7. Place the glass mixing bowl on the mixer
stand (See figure 4).
8. Press the Tilt button while holding the
mixer body and lower the mixer assembly
so the beaters are inside the mixing bowl.
9. Plug the cord into a 230/240v power
outlet and turn power 'ON'.
10. Place the beaters into the ingredients
inside the mixing bowl. To commence
mixing, move the speed selector switch
to the right to the required speed.
Always begin mixing on a lower speed
setting to prevent splattering, increasing
to the desired speed for the mixing task.
The speed setting can be adjusted during
operation by moving the switch from left
to right.
11. When mixing is complete move the speed
selector switch back the 'OFF' (O)
position. Turn the power off at the power
outlet and unplug cord.
12. Press the Mixer Pivot button and raise
the mixer unit to the upright position.
13. Remove the mixer from the stand by
pressing the Mixer Release button.
14. Remove the beaters/dough hooks by
pressing the eject button while grasping
the beater shafts. The beater/dough hooks
will be released automatically. DO NOT try
to pull the beaters/dough hooks out of the
sockets. Use a spatula to scrape remaining
mixture from the beaters/dough hooks.
ASSEMBLY AND OPERATION cont’d
7
ASSEMBLY AND OPERATION OF YOUR BREVILLE WIZZ MIX
The beater/dough hook
with the white cog wheel
collar should be in the
correct socket so that it
aligns with the cog wheel
gear on the mixer stand.
If not placed correctly, the
bowl will not turn.
Always turn the Wizz Mix off
if you need to scrape down
the bowl during use. Then
continue mixing.
Make sure the mixer is
securely attached to the stand
and locked into the horizontal
position before using.
THE BEATERS/DOUGH HOOKS MUST BE INSERTED INTO THE CORRECT
SOCKET, AS THEY ARE NOT INTERCHANGEABLE . IF NOT PLACED
CORRECTLY, THE BOWL WILL NOT TURN.
ENSURE THE MIXER IS SWITCHED OFF AND UNPLUGGED FROM THE
POWER OUTLET BEFORE ATTACHING THE BEATERS TO THE MIXER
AVOID CONTACT WITH BEATERS DURING OPERATION. KEEP HANDS,
HAIR, CLOTHING, SPATULAS AND OTHER UTENSILS AWAY FROM THE
BEATERS TO PREVENT INJURY OR DAMAGE TO THE WIZZ MIX.
Fig. 1
Fig. 2
Fig. 3
Fig. 4
BR3936 EM6 WizzMix Plus Book 22/7/02 4:29 PM Page 6


