


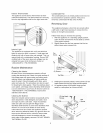


CASTERRAILINSTALLATION
• Placeawasherontooneofthesixlongboltsandslideboltthroughthe
holelocatedatthefrontofcasterrail•
• Alignthecasterrailassemblywiththerighthandsideoftheunit•
• Aligntheboltwiththethreadedholeinthefrontrightfootpadofthe
unit•Threadtheboltintotheholeuntilfingertight(seeFig.3)•
: :>, l:
Figure3 o_-
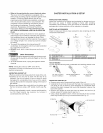
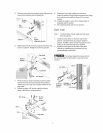
REARSWIVELCASTERINSTALLATION
• Placeawasherononeofthesixlongboltsandthenfeedthebolt
throughtheholeinoneoftheswivelcasters(seeFig•4).
• Next,insertthatsamecasterboltthroughtheholeonthemetalspacer
plateandthenthrutherearholeofthecasterrail(seeFig.5).
• Threadthecasterboltintotheholeinthebottom-mostfootpadonthe
unit.
• Tightenbothtopandbottomboltssecurelyusinga 1/2inchfixedor
socketwrench,
• Repeatthesameprocedureonthelefthandside
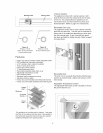
AppliancePlacement
Leaveaone(1)inchspaceonallsidesandthebackofthe
cabinetforease of installation, proper air circulation and
electrical connections. DO NOT block the front grill on
the lower front of your appliance. Sufficient air circulation
is essential for the proper operation of your appliance.
Choose a place that is near a grounded electrical outlet. For
the most efficient operation, the appliance should be located
where surrounding temperatures will not drop below 40°F
(5°C) or exceed 110°F (43°C). Additional compressor heaters
are not recommended•
Insulation
The insulated space of this cabinet is sealed to
maintain peak efficiency, Holes drilled in the cabinet
may destroy that seal and damage electrical wiring
located in the insulated space,
DAMAGED ELECTRICAL WIRING OR WET
INSULATION CAUSED BY DRILLING WILL VOID THE
WARRANTY,
Appliance Start-Up
Once the appliance has been located in its permanent
location and the proper power and grounding has
been provided, the following items must be checked or
completed:
SWIVEL
CASTER
%_ I
ii ii/ _i i'_
i I _
Figure 4 Figure 5
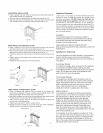
FRONT SWIVEL CASTER INSTALLATION
• Place the tapping plate between the front bottom of the cabinet and
caster rails as depicted in Figure 6. Make sure the tapped holes in the
tapping plate align with the center slot in the caster rail.
• Next, place a washer on one of the six long bolts and then feed the bolt
through the hole in one of the swivel casters (see Fig. 4).
• Then, place the spacer plate on the caster and thread the caster bolt
into the hole in the tapping plate•
• Tighten securely using ½" fixed or socket wrench•
• Repeat the same procedure on the left hand side• After installation,
carefully tip the unit up with the help of an assistant•
Tapping Plate :]:... :'--
7:,,''
Figure 6
Cool Down Period
For safe food storage, allow 24 hours for the appliance
to cool down completely before loading with food,
The appliance will run continuously for the first several
hours, De not place any food in the appliance until
after the first 24 hours of operation,
Thermostat Settings
The appliance is shipped from the factory with the
thermostat set at about the mid-point of the operating
range, Adjustments colder or warmer can be made
after the appliance has been running for at least 8
hours, Allow at least 8 hours for temperature
stabilization before re-adjusting the thermostat,
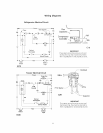
Defrost Setting
The appliance is designed to defrost automatically
every 12 hours. To set the time of defrost, wait until
the desired time to defrost. With the notch on the
timer knob aligned with the line on the bracket
(Figure A), turn the defrost timer knob clockwise
slowly. The timer will click several times, then once
loudly, at which point the defrost cycle begins. The
timer knob will advance through the defrost cycle,
then click loudly at the end of the cycle (Figure B).
The appliance will defrost automatically every 12 hours
after the first defrost cycle.
For example, to set the appliance to defrost at 10:00
a.m., turn the timer knob clockwise at 10:00 a.m. until
the timer clicks loudly.The appliance will defrost daily
at 10:00 a.m. and again12 hours later at 10:00 p.m.
Note: The product interior temperature will rise during
the defrost cycle every 12 hours.