


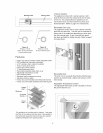


InteriorThermometer
Theappliancecomeswithathermometertoshow
internaltemperatures.Thethermometeristobehung
fromthetopadjustableshelfontherighthandside.
CondensatePan
Thecondensatepanisinafixedpositionandmustnot
beremovedfromunderthecabinet.Ifthepanis
removed,condensatewilldripontothefloor.
1
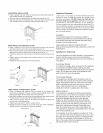
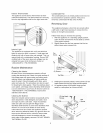
Reversing Door
This appliance features a door that can provide either
a left hand or right hand opening. It comes from the
factory in the right hand position.
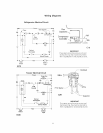
Follow these steps to reverse the opening:
1. With the appliance in a standing upright position,
open the door and remove the toe plate (2 screws
in the upper corners).
2. Slightly loosen the two hex spacers that the toe
plate screws were screwed into.
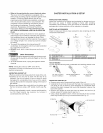
Interior Light
The appliance is equipped with a 40 watt bulb that
lights up when the door is opened. If bulb goes bad
replace with bulb of same type and wattage. This is a
special bulb with a shatterproof coating. Use an NSF
certified bulb of the same type and wattage (can be
ordered from your Arctic Air Service Center at
1-800-490-9574 1 PIN 2163600900).
Top
Routine Maintenance
Cleaning the Interior
Be sure to turn the temperature control to off and
unplug the electrical cord. Wash the inside surface of
the storage area with warm water and baking soda
solution (about one tablespoon of baking soda per
quart of water). Rinse thoroughly with clean, warm
water and wipe dry. The procedure can also be used
for cleaning the door gasket. Wipe the stainless steel
cover plates with Magic Clean Stainless Steel Cleanei
(can be ordered from your Arctic Air Service Center at
1-800-490-9574 1 PIN 218490900) or some other
stainless steel cleaner.
Cleaning the Exterior
Wipe the textured cabinet exterior occasionally with a
cloth dampened in mild detergent and water, rinse
and wipe dry with a soft cloth. Wipe the stainless
steel door plate and toe grill with Magic Clean
Stainless Steel Cleaner or some other stainless steel
cleaner. Do not use razor blades or other sharp
instruments that can scratch the appliance surface
when removing adhesive labels. Any glue left from the
tape can be removed with a mixture of warm water
and mild detergent or touch the residue with the
sticky side of tape already removed. DO NOT REMOV
THE SERIAL PLATE.
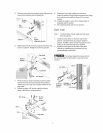
(2)Hex Head
Spacers
(2) Screws
Toe Plate -- Door
3. Holding door securely closed, remove three (3) hex
head screws from the top hinge and flat spacer.
4. Lift appliance door off of bottom hinge and set
aside in a safe place (so it does not fall)
[3) Hex Head --I_@
Screws /
Flat
Top Hinge_ 7- Spacer
J
J
J